|
Size: 2931
Comment:
|
Size: 4536
Comment:
|
| Deletions are marked like this. | Additions are marked like this. |
| Line 5: | Line 5: |
| For general tips on using FsFast, download this powerpoint: | For general tips on using FsFast, download this [[http://surfer.nmr.mgh.harvard.edu/pub/docs/freesurfer.fsfast.ppt|FS-FAST powerpoint]] |
| Line 7: | Line 7: |
| [[http://surfer.nmr.mgh.harvard.edu/pub/docs/freesurfer.fsfast.ppt|Using FS-FAST]] | This walkthrough demonstrates how to run a functional connectivity analysis on resting state fMRI data. |
| Line 9: | Line 9: |
| *STEP 1: Unpack Data into the FSFAST Hierarchy using "unpackscmdir" | *STEP 1: Unpack Data into the FSFAST Hierarchy using [[https://surfer.nmr.mgh.harvard.edu/fswiki/unpacksdcmdir|unpacksdcmdir]] |
| Line 11: | Line 11: |
| [[https://surfer.nmr.mgh.harvard.edu/fswiki/unpacksdcmdir|unpacksdcmdir]] | Ex: unpacksdcmdir -src dicomdir/subject/ALLDICOMS -targ fcMRI_dir/subject -cfg subject_config.txt -fsfast -unpackerr In this example command... *Have all fMRI dicoms linked into "ALLDICOMS" directory *Arguement for "-targ" specifies output directory *subject_config.txt is a configuration text file you create (format below) *Use "-fsfast" to generate fsfast hierarchy subject_config.txt format: 28 bold nii f.nii 29 bold nii f.nii Col.1: scan acquisition number Col.2: output dir name will be created within "fcMRI_dir/subject" Col.3: output file format - this example is nifti format Col.4: output filename. In this example, 2 files will be created: fcMRI_dir/subject/028/f.nii fcMRI_dir/subject/029/f.nii |
| Line 14: | Line 33: |
| Line 18: | Line 36: |
| *STEP 2: Reconstruction Anatomical data using "recon-al -all" | *STEP 2: Reconstruction Anatomical data using [[https://surfer.nmr.mgh.harvard.edu/fswiki/recon-all| recon-all]] |
| Line 20: | Line 38: |
| 1.Set SUBJECTS_DIR | Ex: |
| Line 22: | Line 40: |
| setenv SUBJECTS_DIR /path/to/recon_dir/ recon-all -s subject_dirname -all -i pathtoT1dicom_scan1.dcm -i pathtoT1dicom_scan2.dcm In this example command... *set your SUBJECTS_DIR variable to your FreeSurfer subject recon directory *set the subject's directory name with "-s" ... the arguement you provide will become the directory name within $SUBJECTS_DIR *use "-i" to supply the dicoms to reconstruct. Use one "-i" per T1 acquisition. |
|
| Line 27: | Line 52: |
| * D - Check hierarchy of reconstructed anatomical data [[https://surfer.nmr.mgh.harvard.edu/fswiki/recon-all| recon-all]] | * D - Check hierarchy of reconstructed anatomical data |
| Line 29: | Line 54: |
| 1.Make FSFAST basic hierarchy (only if data are not unpacked in FSFAST hierarchy) | |
| Line 31: | Line 55: |
| 2.Link to FreeSurfer anatomical analysis | 1.Double-check for FSFAST basic hierarchy |
| Line 33: | Line 57: |
| A - Make subjectname file in the session directory to link a subject's functional & structural data | {{attachment:fsfast-hierarchy.jpg}} 2.Link to FreeSurfer anatomical analysis: A - Create "subjectname" text file in the session directory. Write in it the subject's recon directory name (found within $SUBJECTS_DIR). |
| Line 37: | Line 65: |
| 4.Create a Stimulus Schedule (Paradigm file) in bold folder (A "paradigm" file is a record of which stimulus was presented when & for how long. | |
| Line 39: | Line 66: |
| Each paradigm file has four columns: | *STEP 3: Pre-process your bold data using preproc-sess [[http://surfer.nmr.mgh.harvard.edu/fswiki/preproc-sess|preproc-sess]] |
| Line 41: | Line 68: |
| A - Stimulus onset time (sec) | preproc-sess -s <subjid> -fwhm <#> |
| Line 43: | Line 70: |
| B - Condition ID code (0, 1, 2, ...) | 1.By default this will do motion correction, smoothing & brain masking |
| Line 45: | Line 72: |
| C - Stimulus Duration (sec) | 2.Quality Check (plot-twf-sess) 3.Examine additions to FSFAST hierarchy (in each run of bold dir): |
| Line 47: | Line 74: |
| D - Stimulus Weight (usually 1) | ||f.nii || (Raw fMRI data) || ||fmc.nii || (Motion corrected-MC)|| ||fmcsm5.nii|| (MC & smoothed)|| ||fmc.mcdat|| (Text file with the MC parameters (AFNI))|| ||brain.mgz ||(Binary mask of the brain)|| |
| Line 49: | Line 80: |
| *STEP 3: Pre-process your bold data using preproc-sess [[http://surfer.nmr.mgh.harvard.edu/fswiki/preproc-sess| preproc-sess]] # Preprocessing of fMRI Data () preproc-sess -s <subjid> -fwhm <#> 1.By default this will do motion correction, smoothing & brain masking 2.Quality Check (plot-twf-sess) 3.Examine additions to FSFAST hierarchy (in each run of bold dir): f.nii (the raw data) fmc.nii (motion corrected-MC) fmcsm5.nii (MC & smoothed) fmc.mcdat - text file with the MC parameters (AFNI) mcextreg.bhdr - binary mask of the brain |
# Function-Structure Registration View unregistered: |
| Line 61: | Line 82: |
| # Function-Structure Registration View unregistered tkregister-sess -s <subjid> -regheader) Run automatic registration spmregister-sess -s <subjid> Check automatic registration tkregister-sess -s <subjid> |
. [[http://surfer.nmr.mgh.harvard.edu/fswiki/tkregister-sess|tkregister-sess]] -s <subjid> -regheader) |
| Line 66: | Line 84: |
| A - Make edits if needed using scale as the last resort Check talairach registration tkregister2 --s <subjid> --fstal --surf | Run automatic registration: . [[http://surfer.nmr.mgh.harvard.edu/fswiki/spmregister-sess|spmregister-sess]] -s <subjid> Check automatic registration: . [[http://surfer.nmr.mgh.harvard.edu/fswiki/tkregister-sess|tkregister-sess]] -s <subjid> A - Make edits if needed using scale as the last resort Check talairach registration: . [[http://surfer.nmr.mgh.harvard.edu/fswiki/tkregister2|tkregister2]] --s <subjid> --fstal --surf |
| Line 70: | Line 98: |
| *STEP 5: Use mkanalysis-sess to setup an analysis for your FC data | *STEP 5: Use [[http://surfer.nmr.mgh.harvard.edu/fswiki/mkanalysis-sess|mkanalysis-sess]] to setup an analysis for your FC data |
| Line 72: | Line 100: |
| *STEP 6: Use selxavg3-sess to run the subject-level analysis | *STEP 6: Use [[http://surfer.nmr.mgh.harvard.edu/fswiki/selxavg3-sess|selxavg3-sess]] to run the subject-level analysis |
| Line 74: | Line 102: |
| *STEP 7: Use mri_glmfit or selxavg3-sess to run a group-level analysis | *STEP 7: Use [[http://surfer.nmr.mgh.harvard.edu/fswiki/mri_glmfit|mri_glmfit]] or [[http://surfer.nmr.mgh.harvard.edu/fswiki/selxavg3-sess|selxavg3-sess]] to run a group-level analysis |
work in progress...
About
Walkthrough: How to use FsFast and fcseed-sess for functional connectivity analysis including example commands.
For general tips on using FsFast, download this FS-FAST powerpoint
This walkthrough demonstrates how to run a functional connectivity analysis on resting state fMRI data.
*STEP 1: Unpack Data into the FSFAST Hierarchy using unpacksdcmdir
Ex: unpacksdcmdir -src dicomdir/subject/ALLDICOMS -targ fcMRI_dir/subject -cfg subject_config.txt -fsfast -unpackerr
In this example command...
- Have all fMRI dicoms linked into "ALLDICOMS" directory
- Arguement for "-targ" specifies output directory
- subject_config.txt is a configuration text file you create (format below)
- Use "-fsfast" to generate fsfast hierarchy
subject_config.txt format:
28 bold nii f.nii 29 bold nii f.nii
Col.1: scan acquisition number Col.2: output dir name will be created within "fcMRI_dir/subject" Col.3: output file format - this example is nifti format Col.4: output filename. In this example, 2 files will be created:
- fcMRI_dir/subject/028/f.nii fcMRI_dir/subject/029/f.nii
1.QA Check after unpacking:
- A - Check unpacked data (time points, # of slices ..etc)
- B - Check FSFAST hierarchy in session folder
*STEP 2: Reconstruction Anatomical data using recon-all
Ex:
setenv SUBJECTS_DIR /path/to/recon_dir/ recon-all -s subject_dirname -all -i pathtoT1dicom_scan1.dcm -i pathtoT1dicom_scan2.dcm
In this example command...
set your SUBJECTS_DIR variable to your FreeSurfer subject recon directory
- set the subject's directory name with "-s" ... the arguement you provide will become the directory name within $SUBJECTS_DIR
- use "-i" to supply the dicoms to reconstruct. Use one "-i" per T1 acquisition.
2.QA Check:
- A - Check talairach transformation
B - Check skull strip, white matter & pial surface
- C - Re-run "recon-all" if edits are made
- D - Check hierarchy of reconstructed anatomical data
1.Double-check for FSFAST basic hierarchy
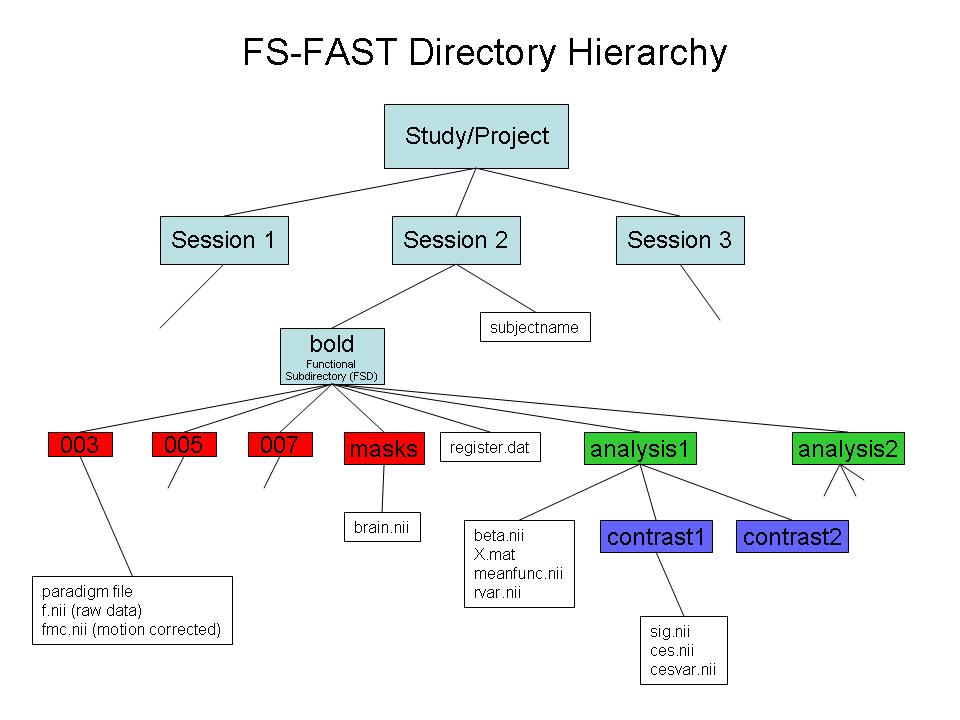
2.Link to FreeSurfer anatomical analysis:
A - Create "subjectname" text file in the session directory. Write in it the subject's recon directory name (found within $SUBJECTS_DIR).
3.Create a sessid file (text file with list of your sessions)in your Study DIR.
*STEP 3: Pre-process your bold data using preproc-sess preproc-sess
preproc-sess -s <subjid> -fwhm <#>
1.By default this will do motion correction, smoothing & brain masking
2.Quality Check (plot-twf-sess) 3.Examine additions to FSFAST hierarchy (in each run of bold dir):
f.nii
(Raw fMRI data)
fmc.nii
(Motion corrected-MC)
fmcsm5.nii
(MC & smoothed)
fmc.mcdat
(Text file with the MC parameters (AFNI))
brain.mgz
(Binary mask of the brain)
# Function-Structure Registration View unregistered:
tkregister-sess -s <subjid> -regheader)
Run automatic registration:
spmregister-sess -s <subjid>
Check automatic registration:
tkregister-sess -s <subjid>
A - Make edits if needed using scale as the last resort Check talairach registration:
tkregister2 --s <subjid> --fstal --surf
*STEP 4: Use fcseed-sess to generate time-course information for your chosen seed region (as well as nuisance variable signal).
*STEP 5: Use mkanalysis-sess to setup an analysis for your FC data
*STEP 6: Use selxavg3-sess to run the subject-level analysis
*STEP 7: Use mri_glmfit or selxavg3-sess to run a group-level analysis