|
Size: 6191
Comment:
|
← Revision 25 as of 2025-12-16 00:28:00 ⇥
Size: 6192
Comment:
|
| Deletions are marked like this. | Additions are marked like this. |
| Line 32: | Line 32: |
| * Dice scores of the segmentation, for automated QC (see [[https://surfer.nmr.mgh.harvard.edu/fswiki/SynthSeg|mri_synthseg]] --robust and [[https://www.pnas.org/doi/10.1073/pnas.2216399120|this paper]]. | * Dice scores of the segmentation, for automated QC (see [[https://surfer.nmr.mgh.harvard.edu/fswiki/SynthSeg|mri_synthseg]] --robust and [[https://www.pnas.org/doi/10.1073/pnas.2216399120|this paper]]). |
SuperSynth: Multi-task 3D U-net for scans of any resolution and contrast (including low field and ex vivo)
This functionality is available in development versions news than October 3rd 2025
Author: Juan Eugenio Iglesias
E-mail: jiglesiasgonzalez [at] mgh.harvard.edu
Rather than directly contacting the author, please post your questions on this module to the FreeSurfer mailing list at freesurfer [at] nmr.mgh.harvard.edu
This neural network is loosely based on:
"A Modality-agnostic Multi-task Foundation Model for Human Brain Imaging" Liu et al., in preparation.
Contents
- General Description
- Installation
- Usage
- FAQ
1. General Description
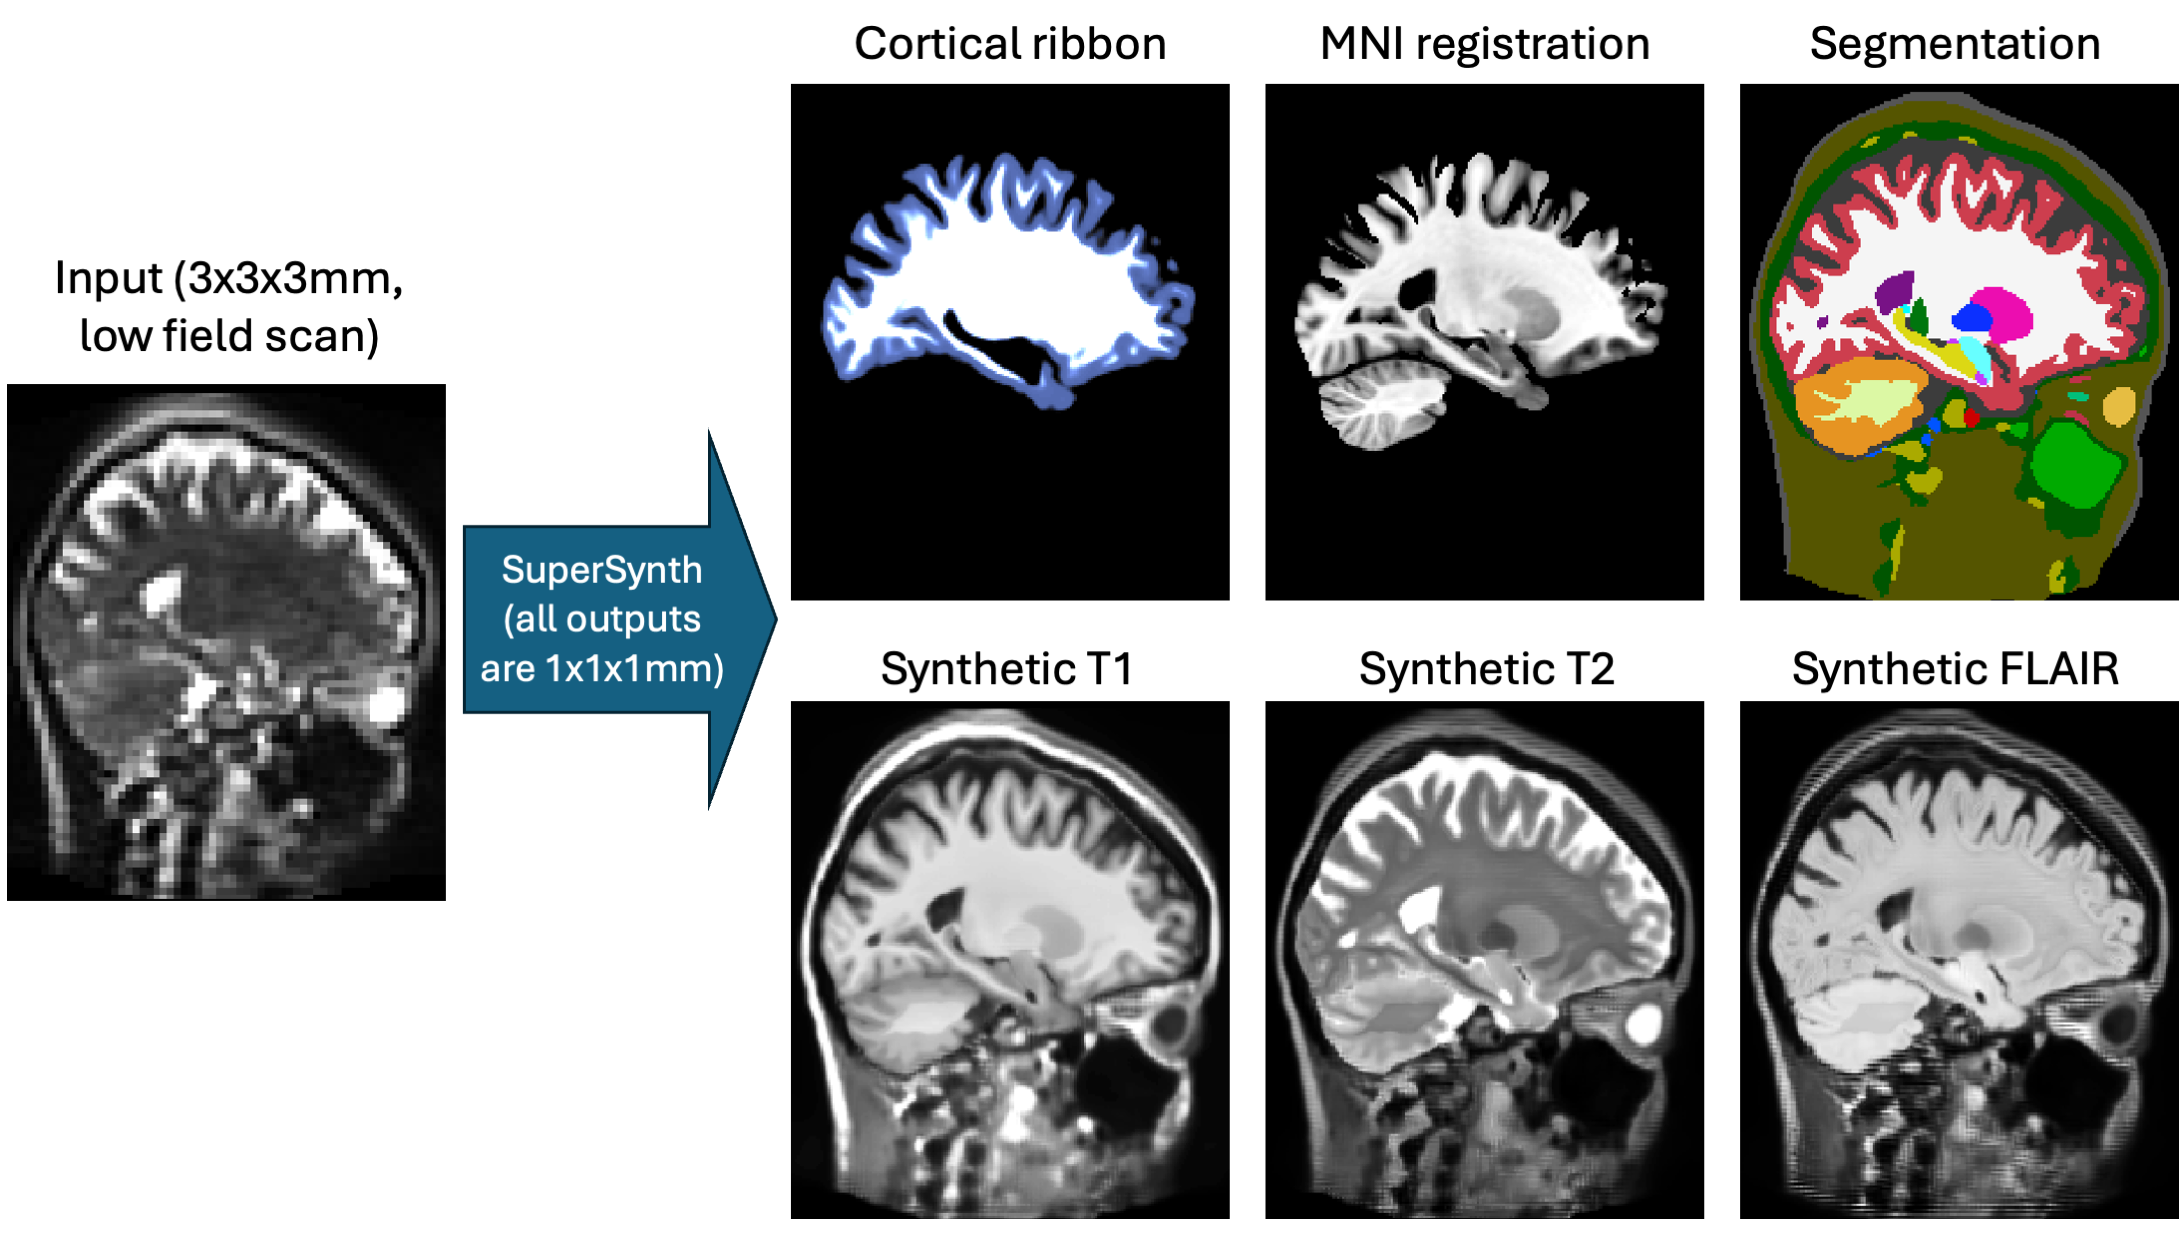
This is a U-Net trained to make a set of useful predictions from any 3D brain image (in vivo, ex vivo, single hemispheres, etc) using a common backbone. Like our other "Synth" tools (e.g., SynthSeg or SynthSR), it is trained on synthetic data to support inputs of any resolution and contrast (including low-field scans). It also support ex vivo scans that are missing cerebellum and brainstem, or single hemisphere. It predicts:
- Segmentation of brain and extra-cerebral regions of interest, as well as white matter lesions.
- Registration to MNI atlas
- Joint super-resolution and synthesis of 1mm isotropic T1w, T2w, and FLAIR scans.
Dice scores of the segmentation, for automated QC (see mri_synthseg --robust and this paper).

2. Installation
The first time you run this module, it will prompt you to download a machine learning model file (unless you have already installed NextBrain, in which case, the model will already be there). Follow the instructions on the screen to obtain the file.
3. Usage
The entry point / main script is mri_super_synth. There are two way of running the code:
- For a single scan: just provide input file with --i, output directory with --o, and type of volume with --mode.
- For a set of scans: you need to prepare a CSV file, where each row has 3 columns separated with commas:
-Column 1: input file
-Column 2: output directory
-Column 3: mode (must be invivo, exvivo, cerebrum, left-hemi, or right-hemi)
Please note that there is no leading/header row in the CSV file. The first row already corresponds to an input volume. Tip: you can comment out a line by starting it with #
The command line options are:
--i [IMAGE_OR_CSV_FILE] Input image to segment (mode A) or CSV file with list of scans (mode
 (required argument)
 --o [OUTPUT_DIRECTORY] Directory where outputs will be written (ignored in mode

--mode [MODE] Type of input. Must be invivo, exvivo, cerebrum, left-hemi, or right-hemi (ignored in mode

- --threads [THREADS] Number of cores to be used. You can use -1 to use all available cores. Default is -1 (optional)
- --device [DEV] Device used for computations (cpu or cuda). The default is to use cuda if a GPU is available (optional)
- --sharpen_synths Use this flag to sharpen the Synth-T1/-T2/-FLAIR predictions (optional)
4. FAQ
Is the intracranial volume (ICV) estimated?
In the in vivo mode, the ICV is just the sum of the volumes of all ROIs, including label 24 (which corresponds to the extracerebral CSF).
Do the synthetic 1mm T1/T2/FLAIR inpaint lesions like SynthSR?
No, this version does not inpaint lesions. The lesions are actually segmented following a strategy similar to WMHSynthSeg.
Does it segment the same structures as SynthSeg?
Almost! It's pretty much SynthSeg minus the ventralDC plus the limbic structures in ScLimbic and the extracerebral regions in SAMSEG-CHARM.
I have an ex vivo hemisphere with cerebellum and/or brainstem
If you use the hemi mode, you will not get the cerebellum or brainstem. Use the exvivo mode instead (with the caveat that you may lose some voxels around the medial wall, which may get assigned to the contralateral hemisphere).
I could swear that there was a --force_tiling option at some point?
Yeah we used to do tiled inference on the GPU, but we don't need it anymore thanks to some improvements to the code that greatly improved memory efficiency.
What is the deal with excluded scans?
If a scan fails (e.g., it's a 2D scans rather than 3D volume), the software prints a message and silently moves to the next scan to analyze (assuming there is one).
* What brain regions are segmented by the software?
The segmentation follows the standard FreeSurfer lookupt table (i.e., in $FREESURFER_HOME/FreeSurferColorLUT.txt, which is the default table used by Freeview). The segmented structures are:
- Left-Cerebral-White-Matter
- Left-Cerebral-Cortex
- Left-Lateral-Ventricle
- Left-Inf-Lat-Vent
- Left-Cerebellum-White-Matter
- Left-Cerebellum-Cortex
- Left-Thalamus
- Left-Caudate
- Left-Putamen
- Left-Pallidum
- 3rd-Ventricle
- 4th-Ventricle
- Brain-Stem
- Left-Hippocampus
- Left-Amygdala
- CSF
- Left-Accumbens-area
- Right-Cerebral-White-Matter
- Right-Cerebral-Cortex
- Right-Lateral-Ventricle
- Right-Inf-Lat-Vent
- Right-Cerebellum-White-Matter
- Right-Cerebellum-Cortex
- Right-Thalamus
- Right-Caudate
- Right-Putamen
- Right-Pallidum
- Right-Hippocampus
- Right-Amygdala
- Right-Accumbens-area
- WM-hypointensities
- Optic-Chiasm
Left-HypoThal-noMB
Right-HypoThal-noMB
- Left-Fornix
- Right-Fornix
Left-MammillaryBody
Right-MammillaryBody
- Left-Basal-Forebrain
- Right-Basal-Forebrain
Left-SeptalNuc
Right-SeptalNuc
- Air-Internal
- Artery
- Other-Tissues
- Rectus-Muscles
- Mucosa
- Skin
- Charm-Spinal-Cord
- Vein
- Bone-Cortical
- Bone-Cancellous
- Optic-Nerve
