Resting state fMRI processing with FSFAST
Adapted from http://surfer.nmr.mgh.harvard.edu/fswiki/FsFastFunctionalConnectivityWalkthrough (this tutorial describes how to perform seed-based functional connectivity analysis, which is an extension of task-based analysis)
General information:
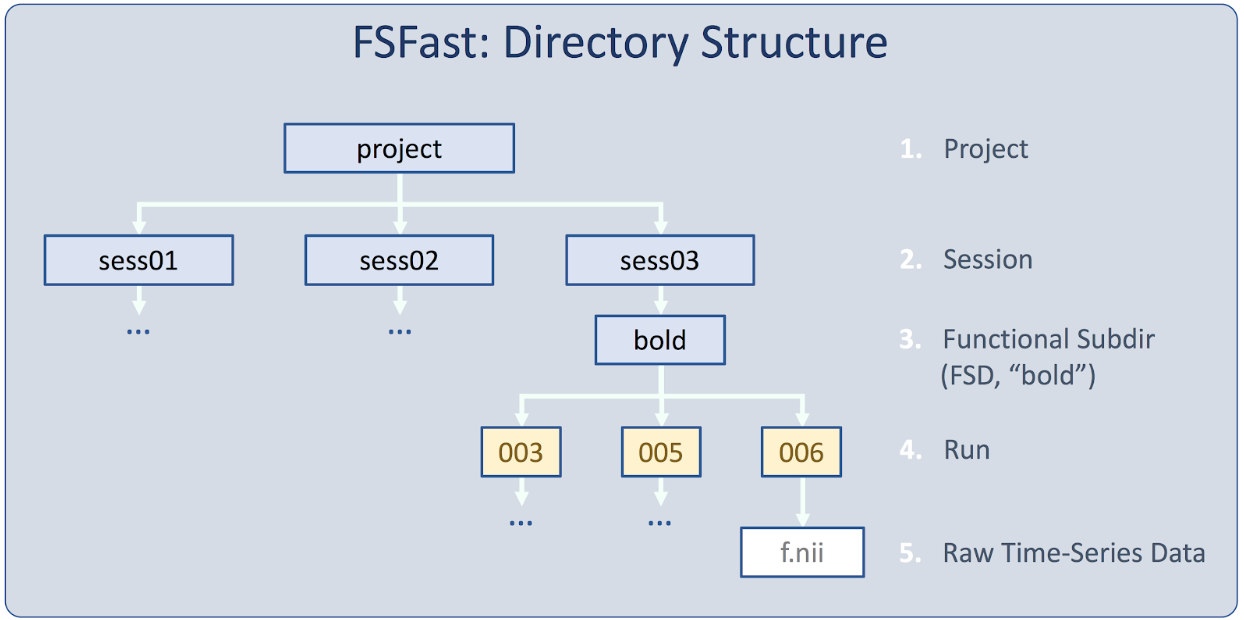
The parent folder of the sessionid folder is called the "Project Folder" or "Project Directory". All the commands below should be run from the Project Folder. If you would like more information on a command or it’s flags, you can always run “command --help”
STEP 1:
Unpack Data into the FSFAST Hierarchy using dcmunpack (run with -help for more documentation).
Sample command: dcmunpack -src dicomdir -targ sessionid -fsfast -run 3 rest nii.gz f.nii.gz -run 4 rest nii.gz f.nii.gz
In this sample command...
Make sure all fMRI dicoms for this subject are in the dicomdir folder or subfolders under this folder Argument for "-targ" specifies output directory here called "sessionid". This should be unique to the subject (and visit if longitudinal). This is called the session folder. -run 3 bold nii.gz f.nii.gz will unpack run 3 fmri to sessionid/bold/003/f.nii.gz Make sure to rename this to /rest/ or whatever you’d like to call your fsd after it’s done unpacking Make sure to keep your data named f.nii.gz! Do not rename this. Use "-fsfast" to generate fsfast hierarchy shown in the image below
If you’ve already converted the dicoms to nifti through another processing pipeline, you still need to reorganize (and potentially, rename) your data according to the FSFAST directory structure.

STEP 2:
Link your functional data to your anatomical data processed through FreeSurfer. This is done by creating a text file called subjectname with the name (or path) of the corresponding anatomical folder as created with recon-all and found in $SUBJECTS_DIR. Save this file under each session folder.
STEP 3:
Pre-process your resting state data using preproc-sess.
Sample command: preproc-sess -s mtl_fcMRI_002_EB -fsd fsrest -stc up -surface self lhrh -mni305 -fwhm 5 -per-run
Command used (no MNI sampling): preproc-sess -s mtl_fcMRI_002_EB -fsd fsrest -stc up -surface self lhrh -fwhm 5 -per-run
By default this command will do motion correction, masking, registration to the anatomical, sampling to the surface, and surface smoothing by 5mm as well as sampling to the mni305 with volume smoothing. The surface sampling is done onto the surface of the lh and rh hemispheres (native space- you could sample to fsaverage by replacing “self” with “fsaverage”) . The mni305 is only used for volume-based analysis of subcortical structures.
You need to run this command for all sessions you plan on analyzing. You can do this by specifying one sessid with the “-s” flag, or multiple sessions by specifying a sessidfile with the “-sf” flag. Note: To specify multiple subjects to process, you need to create a plain text file named sessidfile and save it in your Project dir. This test file should contain only a list of the session ids that you would like to process.
STEP 4:
Create nuisance variables to regress out of your rsfMRI time series data. You only need to configure the seed (fcseed-config) ONCE, and then compute the seeds (fcseed-sess) for each session. So you can save the .config files in the parent directory (by running fcseed-config from the parent dir), but when you run fcseed-sess it will create the .dat files for your nuisance regressor in each run directory of the session you specified. When you run mkanalysis-sess, it knows to look for the .dat files in each run folder.
Sample commands: For white matter: fcseed-config -wm -fcname wm.dat -fsd fsrest -pca -cfg wm.config fcseed-sess -s mtl_fcMRI_002_EB -cfg wm.config
For ventricles and csf: fcseed-config -vcsf -fcname vcsf.dat -fsd fsrest -pca -cfg vcsf.config fcseed-sess -s mtl_fcMRI_002_EB -cfg vcsf.config
These commands will create files wm.dat and vcsf.dat in each session’s fsd folder.
STEP 5:
Use mkanalysis-sess to configure an analysis for your resting state data. Like the fcseed-config above, this is done only once regardless of how many session ids you have.
Sample command: mkanalysis-sess -analysis fsrest.surf.lh -surface self lh -fwhm 5 -notask -nuisreg vcsf.dat 1 -nuisreg wm.dat 1 -mcextreg -polyfit 5 -nskip 4 -fsd fsrest -TR 4.5 -per-run
This command does not perform any analysis; it just creates an analysis configuration called "fsrest.surf.lh". There will be a folder of this name in the Project directory with a text file called analysis.info. The analysis will be run on the left hemisphere (native space) smoothed by 5 mm (this was already performed in preprocessing above). There are five sets of nuisance variables: (1) the CSF from which the top principal component will be used, (2) the white matter from which the top principal component will be used, (3) motion correction parameters (-mcextreg), (4) 5th order polynomial, and (5) the first 4 time points will be discarded. Note you will need to specify the TR with the -TR flag (eg, TR 2 for 2 seconds). Also note that separate mkanalysis-sess commands will need to be run for the each hemisphere and for the mni305 volume-based analysis.
STEP 6:
Use selxavg3-sess to run the first-level analysis outlined by the above mkanalysis-sess command, just as you would with a task-based analysis.
Sample command: selxavg3-sess -s mtl_fcMRI_002_EB -a fsrest.surf.lh -no-con-ok -svres
Where... -s is sessionid -a specified an analysis folder -no-con-ok means to run without a contrast file, which would be necessary for task data -svres means to save residuals. This is essentially the time series data with nuisance regressed out.
The s and a flags are required. Instead of specifying one session, you can pass a session id list with the “-sf” flag. You can also use the “-run-wise” flag if you don’t want to analyze all the runs with the same analysis.
Your data of interest after this step, the residuals, will be located in sessid/bold/analysisname/res/