The first step in first-level analysis is the creation of an "analysis". The analysis is a collection of information about how you want to analyze the functional data. This includes the specification of the input data, event types, event schedules, hemodynamic model, nuisance regressors, etc. This program only configures the analysis; it does not analyze the data. The FLA is configured (with mkanalysis-sess -gui), this is done ONCE regardless of how many data sets you have (you do not even need to have any data to run the configuration), and then it is applied to any and all sessions.
The First-Level Analysis (FLA) consists of:
- Setting up models of the task-related components
- Setting up models of the nuisance components
- Defining contrasts
Configuring the FLA is performed with mkanalysis-sess -gui. When you run:
mkanalysis-sess -gui
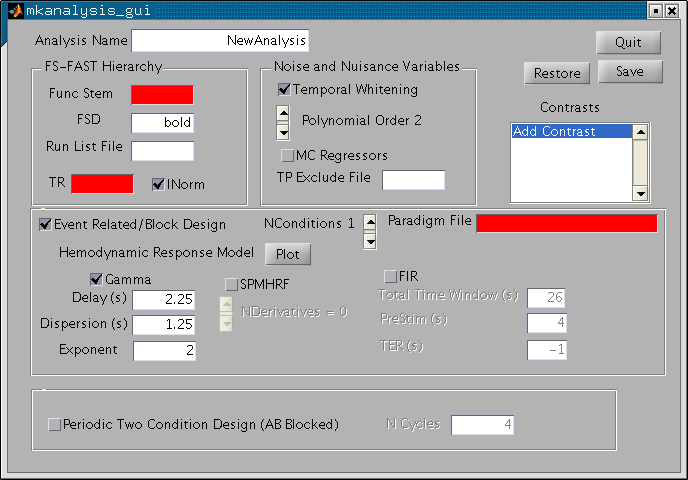
You will see the following window:

You will use this window to specify the input of the analysis, the hemodynamic response model, contrasts and nuisance regressors. The red fields are fields that you must enter before you can save the analysis. There is a lot going on with this GUI, so we'll break it down. In the upper left corner is a panel called "FS-FAST Hierarchy". The "Func Stem" is the input to the analysis. You should specify the output from the preprocessing. Enter "fmcsm5" into the field if you are going to use the motion corrected and 5mm smoothed data. When you hit return, it changes from red to white. Next, enter the TR (sec).
Turn your attention to the "Noise and Nuisance Variables" panel. Low frequency noise so prevalent in fMRI is compensated for in a combination of three ways. Drift components are modeled with polynomial regressors. The order can be adjusted. The motion correction parameters can be used as regressors by checking the "MC Regressors" box. Finally, the remaining noise is modeled as time-invariant linear AR1 process when the "Temporal Whitening" box is checked. There is one additionally way to compensate for noise through the use of a "Time Point Exclude File".
You will specify the model of the task-related signal in the "Event Related/Block Design" panel. Choose the number of conditions by clicking on the "NConditions" slider. This is the number of TASK conditions (do not include the Null/Fixation condition). Enter "*.par" file that you have created earlier. Note that the number of task conditions in the paradigm file must match that specified with "NConditions".
Then, you will specify the Hemodynamic Response Model. There are three choices: Gamma, SPM HRF, and FIR. If you hit the "Plot" button it will show the Gamma and SPM HRF. As you change the Gamma parameters (Delay, Dispersion (Tau), and Exponent (Alpha)), the Gamma plot will change.
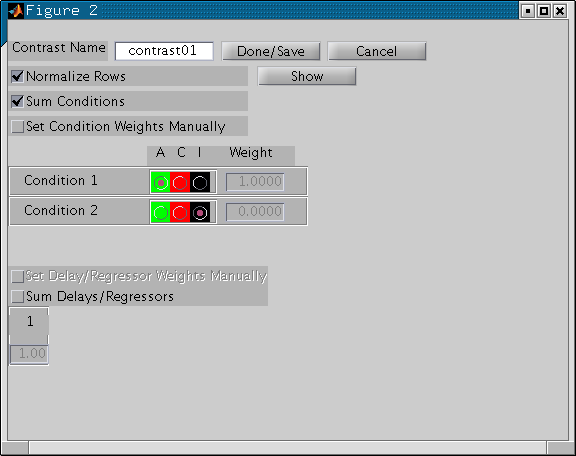
Contrasts are managed through a separate GUI accessed through the "Contrast" list box. A contrast is an instantiation of a hypothesis and is represented by a contrast matrix (i.e., a linear summation of the regression coefficients). When you click on "Add Contrast", you will see the following screen:
Click on "Add Contrast"

There are several things going on here, but the most important is the list of conditions in the middle of the GUI (i.e., "Condition 1", "Condition 2") shown as green, red, and black radio buttons.
- Green indicates an "active" condition.
- Red means a "control" condition
- Black means to ignore the condition in the contrast.
Active conditions are given a weight of +1; controls are given -1; ignores get 0. The weight is given to the right of the buttons. All contrasts are implicitly computed against the Null or Fixation condition. If you want to test the null hypothesis that Condition 1 is no different than the Null condition, then you would make Condition 1 active and ignore the rest. To test the null hypothesis that Condition 1 is no different than Condition 2, then you would make Condition 1 active and Condition 2 control.
You can go back and view and/or edit an contrast by clicking on it in the list box.
The last thing you have to do is to give your analysis a name. Like the contrasts, it should be terse but descriptive. It cannot have any spaces or blanks.
After you hit Save/Quit, control will be returned to the shell that you ran mkanalysis-sess -gui from. If you type "ls", you will see a new folder called "your analysis name". If you "ls that file, you will see analysis.info, analysis.cfg, contrastname.mat. Your configuration is stored in these files. You can browse/edit your configuration by running:
mkanalysis-sess -gui -analysis <analysisname>
If you have chosen a Finit Impulse Response (FIR) to model the hemodynamic response. The FIR does not make any assumptions about the shape of the HRF but is also less interpretable. Again, run
Please visit First-Level Analysis on FsFastTutorial for details.
