Fixing a bad skull strip
To follow this exercise exactly be sure you've downloaded the tutorial data set before you begin. If you choose not to download the data set you can follow these instructions on your own data, but you will have to substitute your own specific paths and subject names.
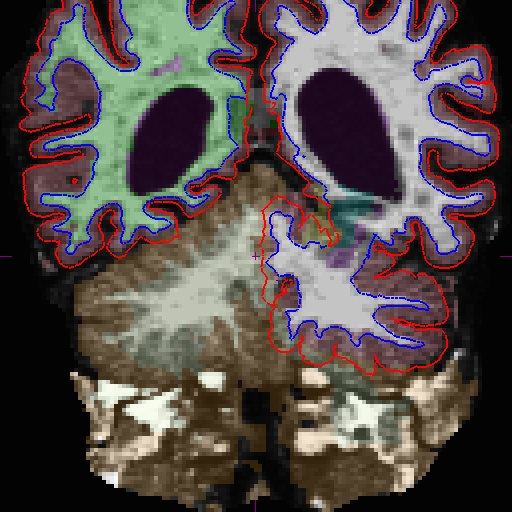
As you probably noticed, the skullstrip only failed at the first timepoint for this subject, OAS2_0088_MR1. There are quite a lot of skull left behind and that adversely affected the surfaces and the aseg. The image below is taken at slice 90.

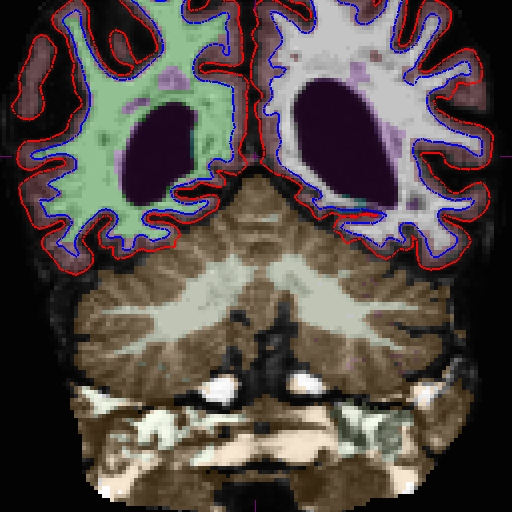
Although the surfaces and the aseg look pretty bad for this timepoint, the surfaces in the base are correct, therefore the surfaces in the long is also correct (since surfaces are copied from the base to the long). However, notice that in OAS2_0088_MR1.long.OAS2_0088, the aseg for the cerebellum is still overlabeling to the dura. Image below at slice 100.

It is then good to correct this problem. You can simply correct this by adjusting the watershed parameter for timepoint 1. Because the default threshold is always 25, to remove more skull, we need to decrease it. This should only take a couple minutes to complete, so feel free to run the command.
recon-all -subjid OAS2_0088_MR1 -skullstrip -wsthresh 20 -clean-bm -no-wsgcaatlas
If you ran the commands, take a look at your output volumes (directory w/o _fixed), or simply check our edited volumes, and verify that the result of the new skull stripping is correct:
tkmedit OAS2_0088_MR1_fixed brainmask.mgz -aux T1.mgz -surfs
After you are satisfied with the results, remember to run the rest of the cross sectional recon-all steps. Notice that although the extra skull is stripped off, the surfaces and the aseg are still incorrect, you'll need to run the following command in order to recreate the surfaces and the aseg. (This step will take very long so you don't need to run it for this tutorial.)
recon-all -subjid OAS2_0088_MR1 -autorecon2 -autorecon3
To save time, you can check in with the recon-all-status.log in the scripts directory of these subjects to see if the normalization step is complete. Or you can wait until the entire recon is done to check whether the surfaces and aseg are updated. They should. To check the corrected version:
tkmedit OAS2_0088_MR1_fixed brainmask.mgz -aux T1.mgz -surfs
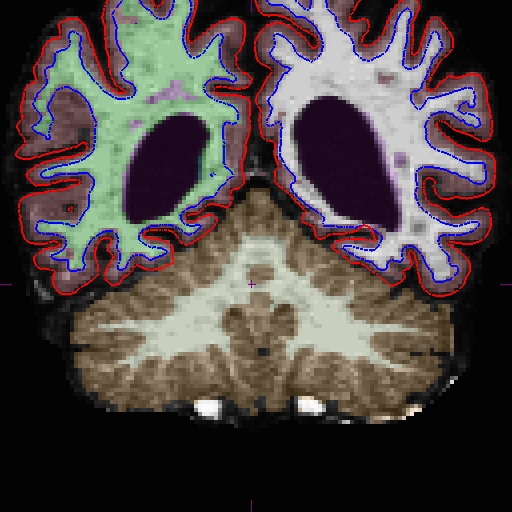
Notice the major improvement on the same slice 90 for OAS2_0088_MR1.

Once that step is complete, you can start recreating your base (remove/rename the base dir if it existed, e.g. mv OAS2_0088 OAS2_0088_old, before running this). To recreate the base using the newly created timepoint(s), use the following command:
recon-all -base OAS2_0088 -tp OAS2_0088_MR1 -tp OAS2_0088_MR2 -all
Then, the final step is to recreate the longitudinals once base and cross sectional runs are complete:
recon-all -long OAS2_0088_MR1 OAS2_0088 -all
recon-all -long OAS2_0088_MR2 OAS2_0000 -all
**NOTE: When recreating the base and longitudinals, it is recommended to remove or rename the existing base and longitudinal directories and start those processes from scratch, if possible, e.g. mv OAS2_0004 OAS2_0004_old.
You can examine the corrected version of the base and longitudinals by using the following commands in separate terminals.
tkmedit OAS2_0088_fixed brainmask.mgz -aux T1.mgz -surfs
tkmedit OAS2_0088_MR1.long.OAS2_0088_fixed brainmask.mgz -aux T1.mgz -surfs
tkmedit OAS2_0088_MR2.long.OAS2_0088_fixed brainmask.mgz -aux T1.mgz -surfs
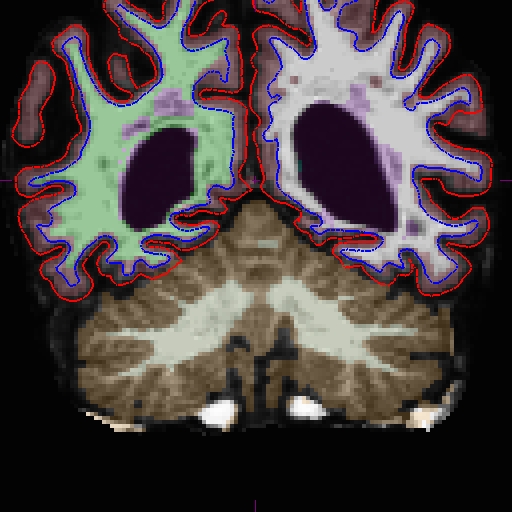
You should not notice any changes to the base and the long for timepoint 2, however there is an improvement on the aseg for the long of timepoint 1. Here is the same slice 100 as shown above.

Now that was a fairly simple case, if you are still up for it, click here for a bigger challenge.
For more details on skull strip errors and the different ways to fix them, refer back to the Troubleshooting Skull Strip Tutorial.