Up to FreeviewGuide |
Back to MeasureTool |
Continue to ReconEdit |
Voxel Edit
The Voxel Edit mode in Freeview includes tools which can be used to remove, add or alter the value of voxels in volumes loaded into Freeview. You can create custom labels or an entire manual segmentation composed of many regions with custom names. The Voxel Edit tools can be used to correct surface topology and segmentation errors, but we recommend you use the Recon Edit mode instead to edit data that has been run through recon-all. This mode has all the tools listed below but with certain restrictions implemented to insure recon edits are recognized by recon-all. Please read the ReconEdit page for more details on the restrictions implemented to the tools described below.
Voxel edit mode is located just above the layer list and underneath the menu bar, or can be found under Action -> Voxel Edit in the menu bar. Alternatively, you can use the shortcut key Alt+E.

Selecting Voxel Edit mode will prompt the Voxel Edit pop-up window to appear, which will include the following button bar:

|
Freehand voxel draw |
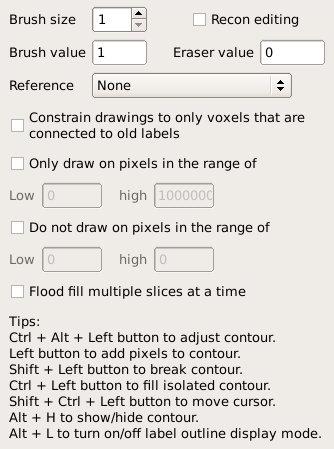
The freehand voxel edit tool allows you to erase and add voxels of a specified value. For instance, this tool allows you to add voxels of a specified value corresponding to those in the FreeSurfer Lookup table (LUT). This is probably the most common voxel edit tool which you will use. Clicking on the Freehand tool button in the Voxel Edit pop-up window toolbar displays several options. Several relevant keyboard shortcuts are listed at the bottom of the Voxel Edit pop-up window as well. Below is a snapshot of the default Freehand tools options.

Brush size: Determines the size of the uniform brush stroke and the number of voxels which can be drawn/erased simultaneously. Examples of the first 5 brush sizes. Note the number of voxels each brush size covers.

Recon editing: Checking this box will change and lock the Brush value to 255, and the Eraser value to 1. It will also enable the voxel draw range limits, with Low set to 5 and high set to 250. This is useful for when making typical edits to Freesurfer recons, where any voxels added to the white matter mask (wm.mgz) should have a value of 255, and any erased voxels from the white matter mask or brainmask volumes should set to 1 so that Freesurfer can identify manual edits. The draw range limits prevent drawing over existing voxels in the white matter mask which have certain values which are useful to Freesurfer and for troubleshooting.
*** For extended editing involving the correction of surface topology and segmentation errors, we strongly suggest you use the Recon Edit mode instead ***
Brush value: Sets value of newly drawn voxels.
Eraser value: Sets value of erased voxels (typically 0 or 1).
Reference: Description N/A
Constrain drawings to...: Description N/A
Only draw on...: Designates the lowest and highest possible values of existing voxels which can be drawn over. Only voxels inside low and high settings can be edited.
Do not draw...: Designates the lowest and highest possible values of existing voxels which can not be drawn over regardless of brush value setting. Only voxels outside low and high settings can be edited.
Flood fill multiple...: Flood Fill operation will edit not only voxels visibile in the current slice, but also any connected voxels in the two other dimensions which meet the current fill criteria settings. Note: You can use the Flood Fill tool while using the Freehand tool by holding down the crtl key and left-clicking. To change the Flood Fill options you will have to switch to using the Flood Fill tool.
|
PolyLine voxel draw |
The PolyLine voxel edit tool can be used to quickly create a rough trace of an area. With the PolyLine tool you can draw a series of points connected by straight lines. Any voxel which the series of straight lines cuts through will be set to the current brush value. Each new point in the series can be added with a left-click. To end the series, middle-click anywhere in the main display window. To end the series and close the PolyLine drawing, right-click anywhere in the main display window. After ending a PolyLine series with a right-click, a line between the first and last points will be created completing the PolyLine series. The PolyLine tool can be useful for drawing ROI labels or segmenting sub-cortical structures, as it is very useful for drawing curved lines.The addition of each point of the outline is considered to be independent of the others and can be undone in the reverse order they were created. After completing and closing a PolyLine series, you can then easily fill it in by holding the crtl key and left-clicking inside the region outlined with the PolyLine tool. Note that the PolyLine tool has the same set options as the Freehand tool (described above).
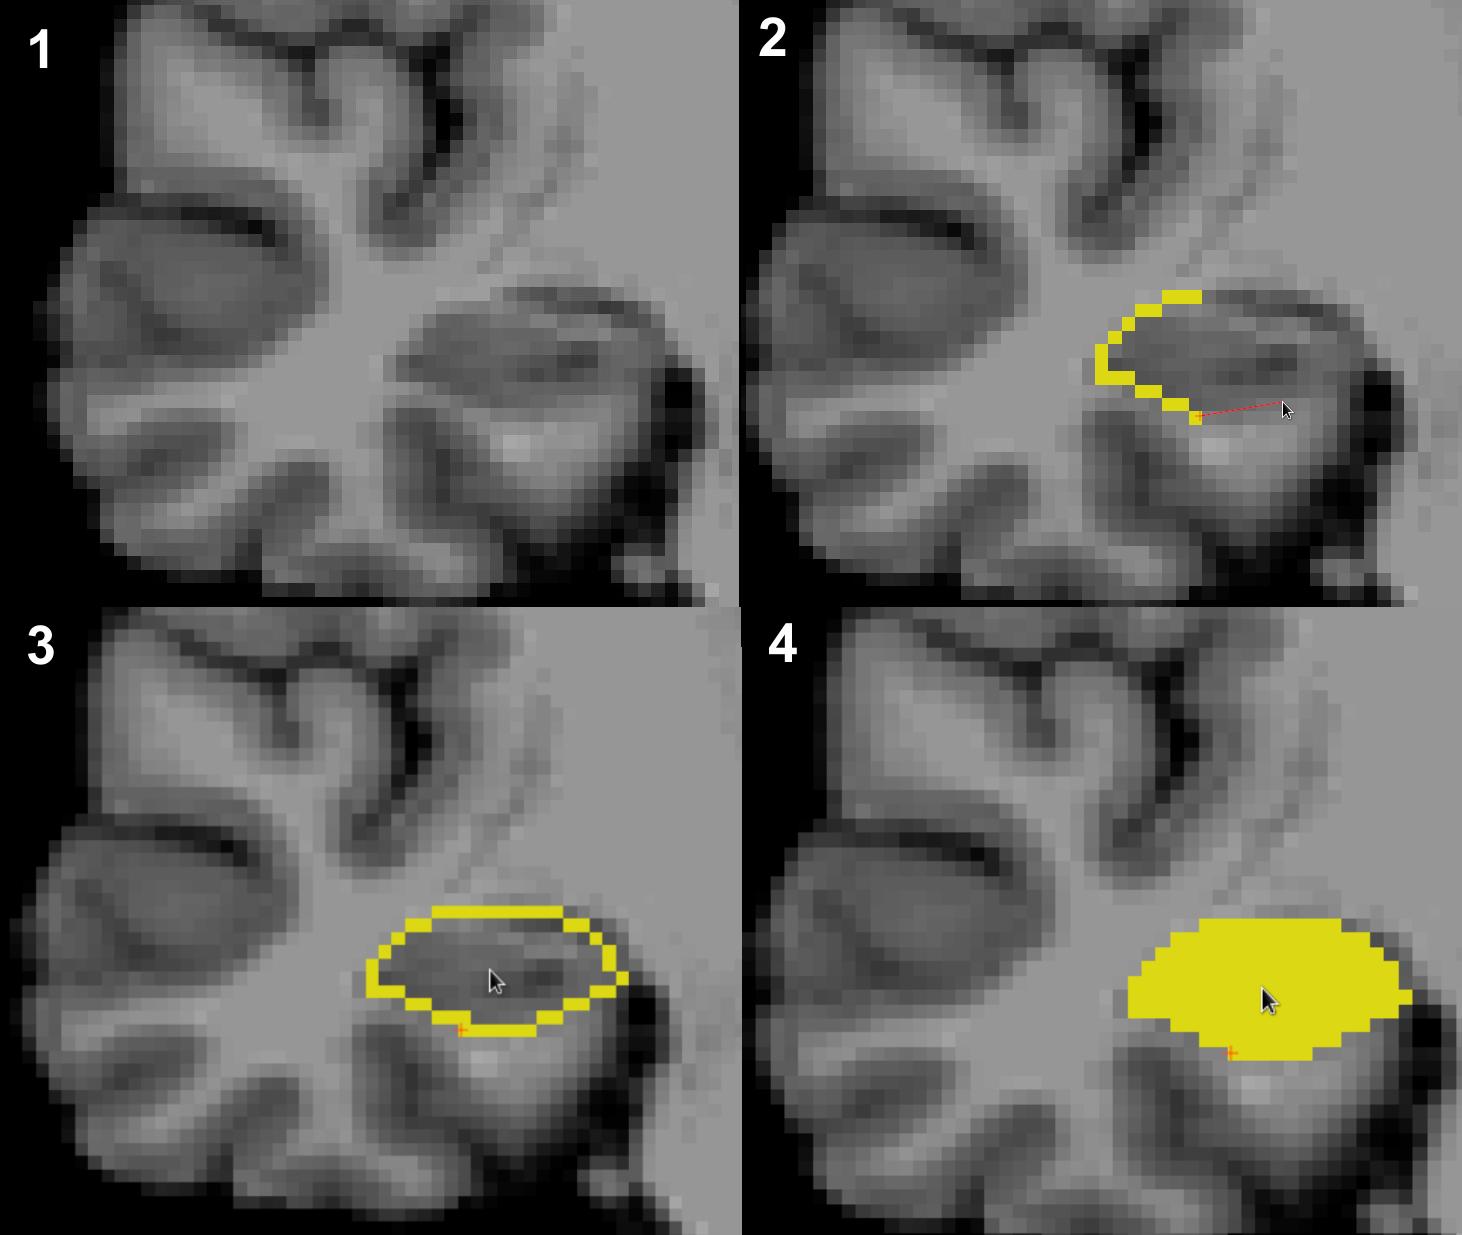
Below is an example where a new label volume was created with Color map set to Lookup Table, and overlaid on top of a norm.mgz volume (1). The PolyLine tool was then used to outline the hippocampus with a brush value of 53 (2 & 3), and then the hippocampus outline was filled in with the flood fill tool (crtl+left-click) (4).

|
Livewire voxel draw |
Similar to the PolyLine tool, the Livewire tool can be used to quickly create a rough trace of an area, but each segment of the outline you draw has some flexibility and will not necessarily be straight. Each new point in the series can be added with a left-click. To end the series, right-click anywhere in the main display window. Unlike the PolyLine tool, after ending a Livewire series, a line between the first and last points will not be created. The addition of each segment of the outline is considered to be independent of the others and can be undone in the reverse order they were created by clicking Ctrl+Z or "undo" under the Edit menu. Note that the Livewire tool has the same set options as the Freehand tool (described above).
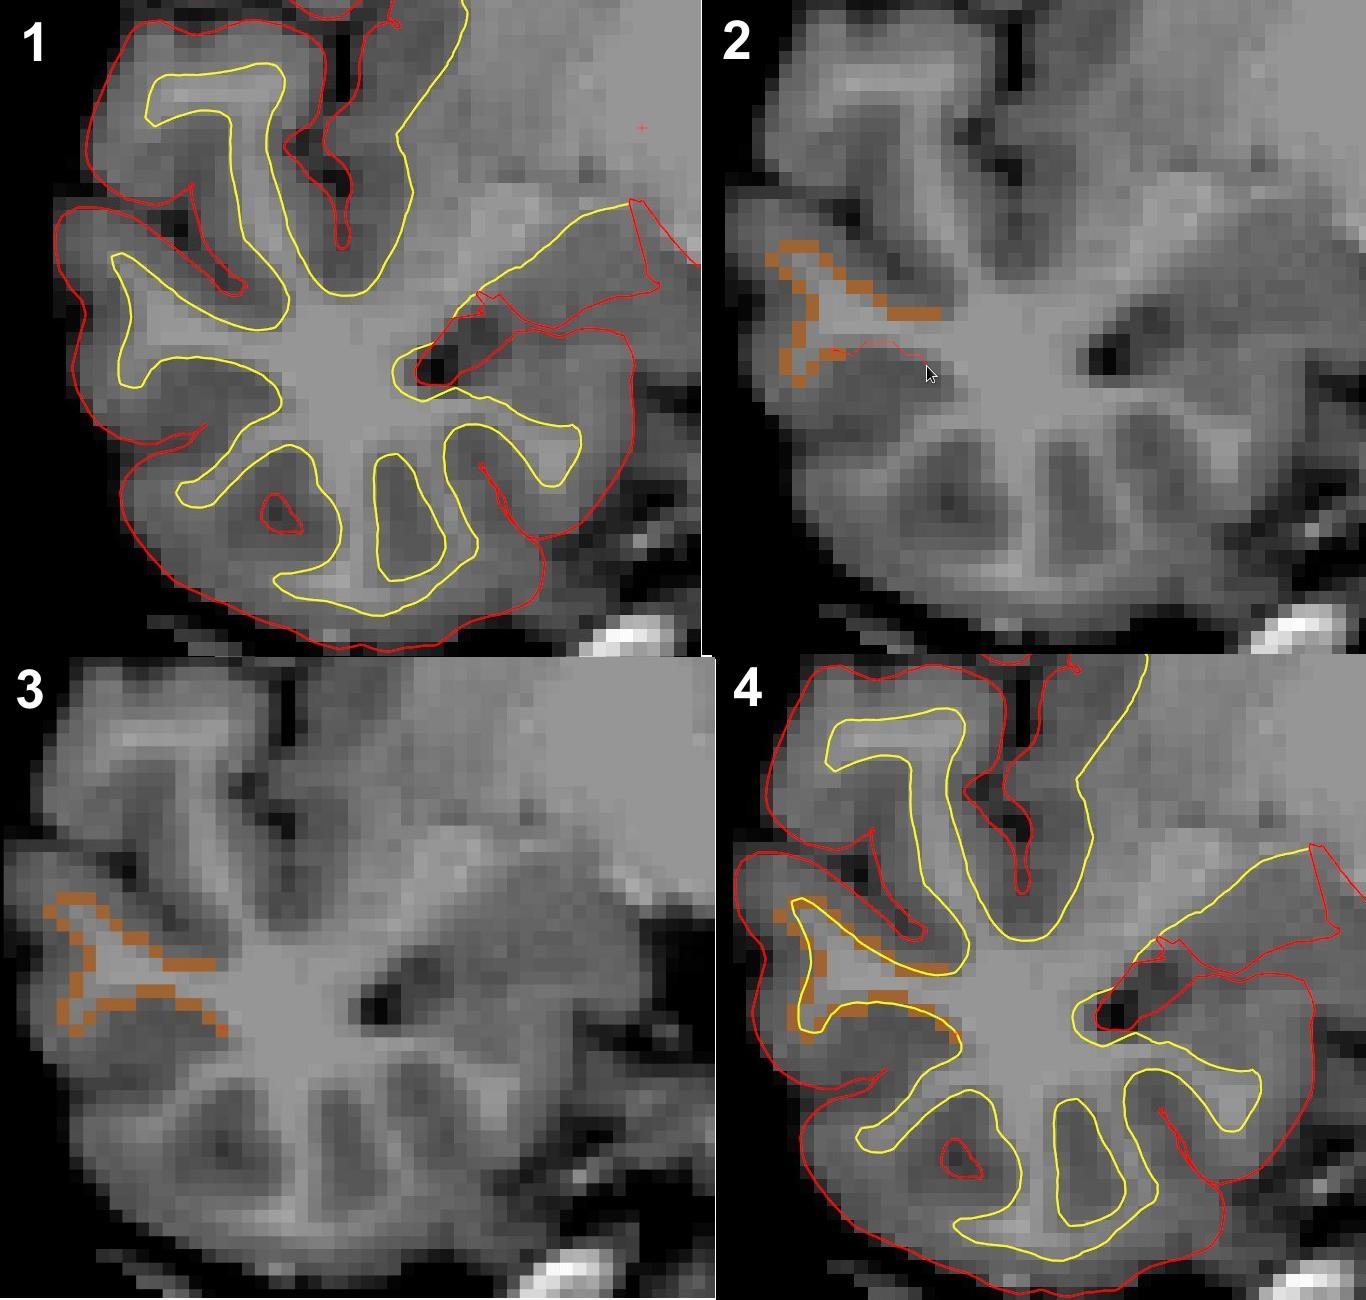
Below is an example where the Livewire tool has been used to draw a middle temporal gyrus label which could be converted to a surface label. The cortical label was drawn on a new label volume overlaid on top of the brainmask volume. The pial and white matter surfaces are displayed in first and last panel simply as a reference.

|
Flood fill voxel draw |
The Flood Fill tool allows you to fill-in or erase connected voxels which share an identical value or some degree of similarity determined by you before hand. It is worth knowing that at any time when using any of the other voxel edit tools, you can hold down crtl and you cursor will change to the Flood Fill tool. Holding down the crtl key and left clicking on a voxel will carry out the default Flood Fill operation. This will change the voxel you clicked on and any connected voxels with identical value to the current Brush value setting. With the Flood Fill tool selected in the Voxel Edit pop-up window, you can adjust a couple parameters. Most notably, the tolerance threshold and the eraser value, as well as imposing some additional limitations on the Flood Fill tool.
Brush size: Description N/A
Brush value: Sets value of filled voxels.
Eraser value: Sets value of erased voxels (typically 0 or 1) selected with fill operation.
Reference: Description N/A
Tolerance: Extent to which (if any) neighboring voxels without identical values are included in the fill operation. At 0% only connected voxels equal to the value of the clicked voxel will be filled, with higher tolerance values leading to larger filled regions (less conservative).
Constrain drawings to...: Description N/A
Only draw on...: Designates the lowest and highest possible values of existing voxels which can be filled in. Only voxels inside low and high settings can be included in the filled-in region.
Do not draw...: Designates the lowest and highest possible values of existing voxels which can not be filled in regardless of brush value setting. Only voxels outside low and high settings can be included in the filled-in region.
Flood fill multiple...: Flood Fill operation will edit not only voxels visibile in the current slice, but also any connected voxels in the two other dimensions which meet the current fill criteria settings.
|
Clone voxel(s) from another volume |
The Clone Voxel tool can be used to manually copy voxel values from a reference volume onto a target volume. One common application is to clone back in large numbers of voxels which were erroneously removed during a skullstripping or other editing procedure. For instance, instead of rerunning the skullstrip step with different parameters, it may be more efficient to clone back in the missing voxels instead. Using a brush size larger than 1 will speed up the cloning process unless you only need to clone back in a few specific voxels. A larger brush size will also decrease the chances of missing voxels when cloning in large regions.
Brush size: Determines the size of the uniform brush stroke and the number of voxels which can be cloned simultaneously.
Brush value: Description N/A
Eraser value: Description N/A
Reference: Indicates volume from which voxel values will be cloned from, and should not be set to the same volume you intend to edit.
Constrain drawings to...: Description N/A
Only draw on...: Designates the lowest and highest possible values of existing voxels which can be filled in. Only voxels inside low and high settings can be included in the filled-in region.
Do not draw...: Designates the lowest and highest possible values of existing voxels which can not be filled in regardless of brush value setting. Only voxels outside low and high settings can be included in the filled-in region.
Flood fill multiple...: Description N/A
|
Draw contour |
The Contour tool is used to estimate borders between areas of varying intensity. It is most useful for drawing borders between tissue types with high contrast, such as grey or white matter and cerebrospinal fluid. To use the Contour tool, you must first select a volume other than the volume you select as a reference, or create a new volume. When you adjust the contour, it will use the voxel values in the reference volume. To adjust the contour you must drag the mouse while holding down the Ctrl and Alt buttons until you reach the best fit outline of your structure or region of interest. Then, edit the outline using Shift + left click to remove voxels, or left click to add voxels to the contour. Make sure that you outline the entire structure or region and fill in any holes. Finally, fill it in with the appropriate label or value by holding down Ctrl while left-clicking. Turn the contour on and off using the shortcut key Alt + H.
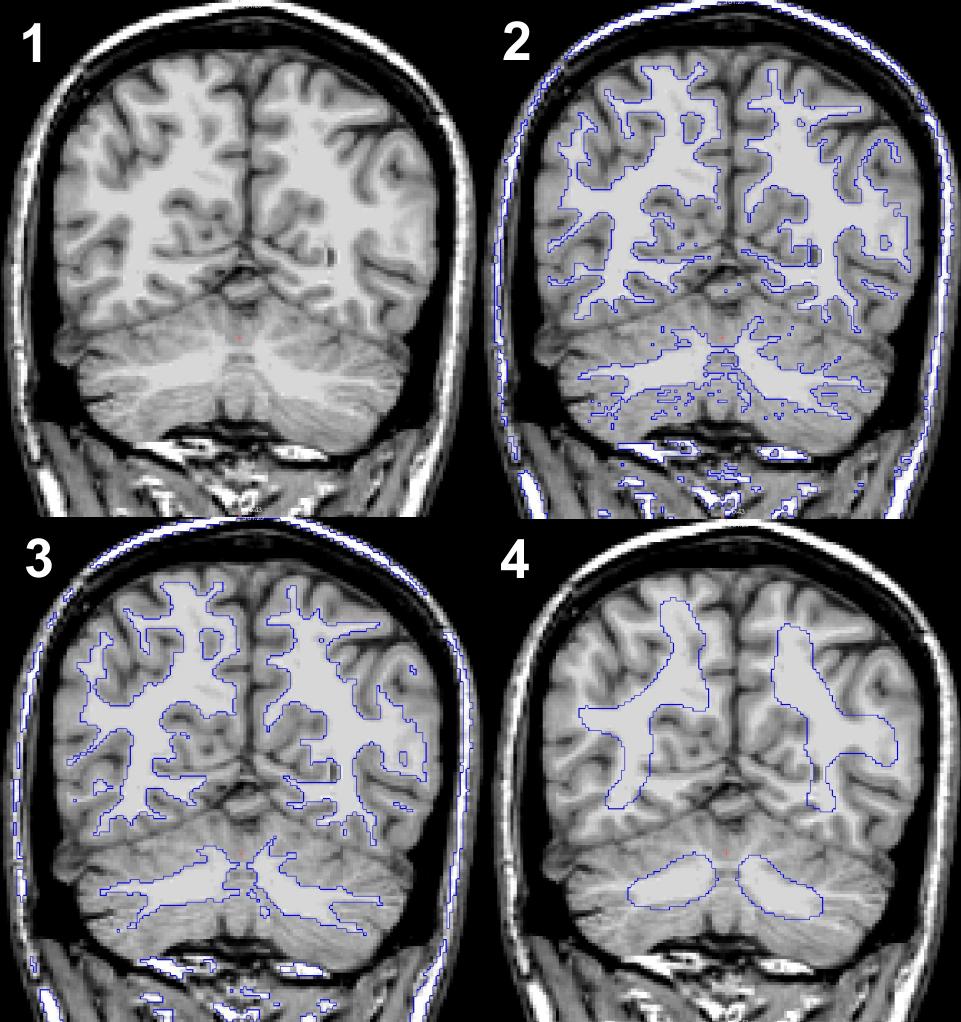
Below are a couple examples of how the contour tool behaves using different settings. The reference volume is the T1 image (1). The remaining snapshots show a contour with threshold value of 99 without Gaussian smoothing (2), with Gaussian smoothing and a Standard deviation of 1 (3), and lastly a contour with Gaussian smoothing and a Standard deviation of 5 (4).

Brush value: Value or label (corresponding to colormap) of contour when filled in.
Eraser value: Description N/A
Reference: The Contour tool will use voxel values in the volume indicated as the reference to adjust the contour.
Contour value: Current threshold value being used to create contour. This value will change as you adjust the contour, but values can be entered manually.
Apply Gaussian smoothing: Turn on/off Guassian smoothing. Can be useful if there is considerable noise in the reference volume.
Standard deviation: Active when using Gaussian smoothing. Larger values make the contour shape rely less on local variations in intensity.
Contour color: Color outline of contour before filling with brush value.
Flood fill multiple...: Description N/A
|
Explore voxel values using Color Picker tool |
The Color picker tool is a simple tool for setting the brush value to be identical to some selected voxel. When working on a segmentation (Color map set to LookupTable) and switching between different label values, the Color picker tool can be used to reset the Brush value by simply clicking on the label you want to edit next. With the LookupTable selected in the Color map drop-down menu, when a new Brush value is set using the Color picker tool, the corresponding label name is highlighted in the label list in the control panel to the left of the main display window.
Recon editing: Description N/A
Brush value: Value which may be altered when the Color picker tool is used to click on a certain voxel.
Eraser value: Description N/A
Reference: The Color picker tool will use voxel values in the volume indicated as the reference to determine the new Brush value. If the Reference volume is set to None, then the currently selected volume in the layer list will be considered to be the reference volume.
Flood fill multiple...: Description N/A
|
Replace Label tool |
Clicking on the Replace Label tool button will cause the Replace Label tool window to apear. You can use this interface to quickly find and replace the value of certain voxels in the entire volume or just in the current slice being viewed.
Original value: Voxels matching this value will be replaced.
New value: Value which the matched voxels will be reset to.
Replace in all slices: Replace label operation carried out across all voxels in volume.
Replace in curent slice only: Replace label operation carried out only across voxels present in the currently active slice view.


