top | previous (Tutorial Data)| next (Preprocessing)
1. Understanding the FS-FAST Directory Structure
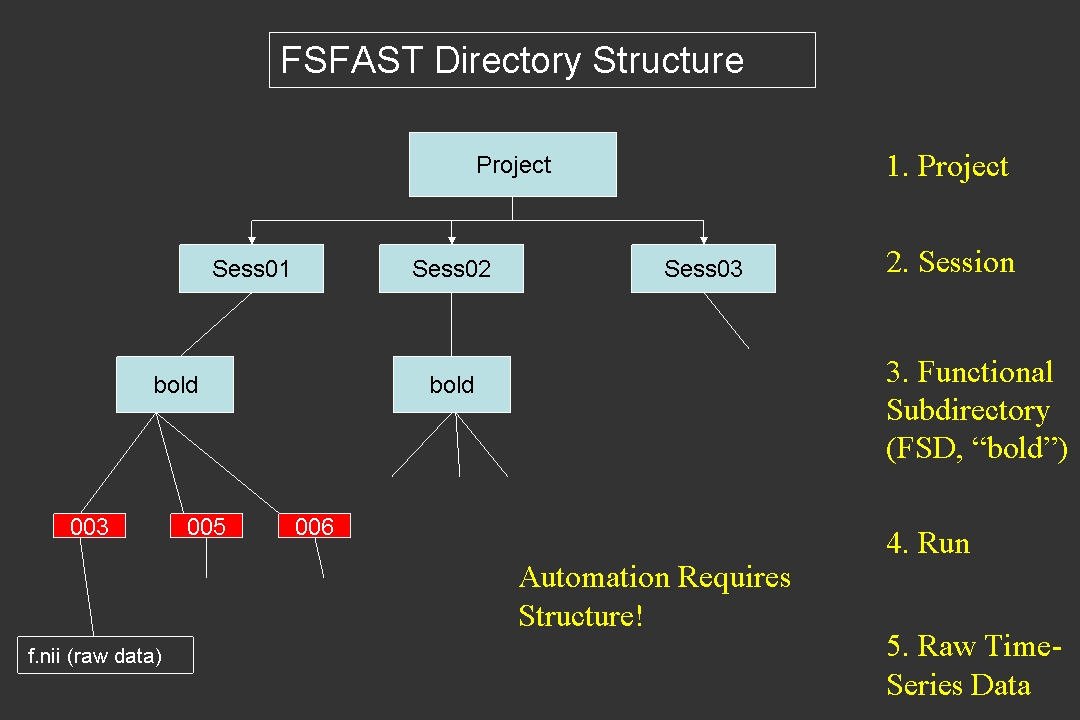
The purpose of this tutorial is to make you familiar with the structure that the data need to be in order to use FS-FAST. You may want to consult the slides from the Intro FSFAST talk.
Contents

2. The Project Directory
To start, cd into the tutorial directory and type 'ls' to see what's there:
cd $TUTORIAL_DATA/fsfast-functional
ls
This is the Project Directory. You will run most of the FSFAST commands from the Project Directory. You will see 18 folders with names like "sess09". These are the 18 subjects. There are some other files and folders there but don't worry about them right now.
3. The 'Session' Folder
All of these sessions have been analyzed with the exception of sess01.noproc. This session is what the directory structure should look like immediately prior to beginning analysis. This includes:
- Directory structure
- Raw data
- subjectname file
- Paradigm files for each run
The directory structure and raw data are usually created by "unpacking" the data with the FreeSurfer dcmunpack or unpacksdcmdir programs, but it could also be done by hand. The subjectname file and paradigm files must be added manually. The folder/directory where all the data for a session are stored is called the 'session' or the 'sessid'. There may be more than one session for a given subject (eg, in a longitudinal analysis). Go into the sess01.noproc folder and run 'ls':
cd $TUTORIAL_DATA/fsfast-functional/sess01.noproc
ls
You will see see a file and two folders:
- subjectname
- bold
- rest (bold and rest are "Functional Subdirectories" (FSDs)).
4. The SUBJECTS_DIR and 'subjectname' File
The anatomical analysis data for this tutorial is found in a separate directory than the functional data. You will need to setup the SUBJECTS_DIR variable to point to this:
export SUBJECTS_DIR=$TUTORIAL_DATA/fsfast-tutorial.subjects
Recall that your current directory is the functional data directory. subjectname is a text file with the name of the FreeSurfer subject as found in $SUBJECTS_DIR (ie, the location of the anatomical analysis). View the contents of the subjectname file:
cat subjectname
Verify that this subject is in the $SUBJECTS_DIR:
ls $SUBJECTS_DIR
NOTE: it is important that the anatomical data and the functional data be from the same subject. The contents of the subjectname file is the only link! Make sure that it is right! After preprocessing, this can be checked by examining the quality of the registration (the BBR cost).
5. Functional Subdirectories (FSDs)
The other two directories (bold and rest) are 'functional subdirectories' (FSDs) and contain functional data. If you
ls rest
you will see '001'. If you
ls bold
you will see '001 002 003 004'. Each of these is a 'run' of fMRI data, ie, all the data collected from a start and stop of the scanner.
5.1. Raw Data
Go into the first run of the bold directory:
cd bold/001
ls
You will see 'f.nii.gz wmfir.par workmem.par'. The raw data is stored in f.nii.gz (compressed NIFTI) and is directly converted from the DICOM file; the others are paradigm files. Examine f.nii.gz file with mri_info:
mri_info --dim f.nii.gz
mri_info --res f.nii.gz
The first command results in '64 64 30 142'. This is the dimension of the functional data. Since it is functional, it has 4 dimensions: 3 spatial and one temporal (ie, 64 rows, 64 cols, 30 slices, and 142 time points or TRs or frames). The second command results in '3.438 3.437 5.000 2000.000'. This is the resolution of the data, ie, each voxel is 3.438mm by 3.437mm by 5.000mm and the TR is 2000ms (2 sec). View the functional data with:
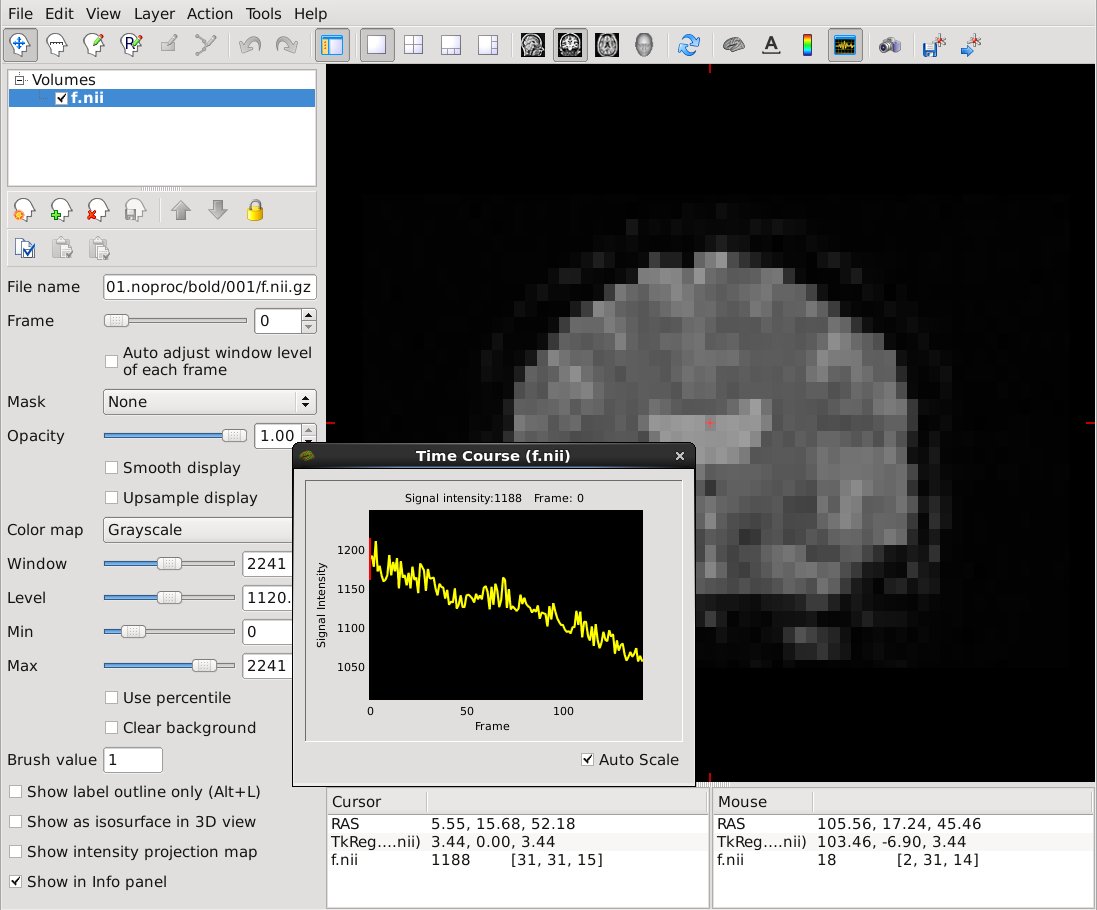
freeview -v f.nii.gz -timecourse
It should look like this:

Click on a voxel to view the bold signal time course for that voxel.
5.2. Paradigm Files
The workmem.par and wmfir.par files are paradigm files. They are text files that you create that indicate the stimulus schedule (ie, which stimulus was presented when). Examine the contents of workmem.par:
cat workmem.par
Each row indicates a stimulus presentation. You will see that each row has 5 columns. The columns are:
- Stimulus Onset Time (sec)
- Numeric Stimulus Identifier
- Stimulus Duration (sec)
- Weight (usually 1)
- Text Stimulus Identifier (redundant with Numeric Stimulus Identifier)
The Stimulus Onset Time is the onset relative to the acquisition time of first time point in f.nii.gz. The Numeric and Text Stimulus Identifiers indicate which stimulus was presented. The Stimulus Duration is the amount of time the stimulus was presented. The Weight allows each presentation to have its own weight in a parametric modulation analysis; here each presentation is weighted equally (weight=1). In this case, there are 5 event types for the Working Memory paradigm (see data description)
- Encode - encode phase
- EDistrator - emotional distractor
- NDistrator - neutral distractor
- EProbe - probe after emotional distractor
- NProbe - probe after neutral distractor
Note two things: (1) Not all the time is taken up (eg, 0-22sec), and (2) Baseline/Fixation is not explicitly represented. By default, any time not covered by stimulation is assumed to be baseline.
6. Specifying Multiple Sessions to Analyze (SessID Files)
It is often the case that one wants to analyze a set of subjects as a group. For example:
- Processing multiple sessions with one command-line
- Running different sets of sessions in parallel
- Grouping sessions together for group analysis
This can be done with something called a Session ID ('sessid') file. There is a Session ID file called 'sessidlist' in the Project Directory:
cd $TUTORIAL_DATA/fsfast-functional
cat sessidlist
This is just a list of all the sessions in the project. You can have multiple Session ID files and they can be called anything. When running FSFAST commands, sessions to analyze can be specified explicitly with a '-s sessid' argument or with a Session ID file with '-sf sessidfile'. The Sess ID file can be named anything.
7. Study Questions
What is the difference between the Project Directory and a Session? Answer
What gets stored in a Run directory? Answer
True or False: the subjectname file goes in the FSD? Answer
What does the first column of the paradigm file tell you? Answer
How is the functional FreeSurfer analysis linked to the antomical FreeSurfer analysis? Answer
Why is a directory structure useful? Answer