|
Size: 23086
Comment:
|
Size: 24612
Comment:
|
| Deletions are marked like this. | Additions are marked like this. |
| Line 1: | Line 1: |
| Describe FsTutorial/OutputData_freeview here. [[FsTutorial|top]] | [[FsTutorial|previous]] | [[FsTutorial/TroubleshootingData|next]] = Inspection of Freesurfer Output = In this exercise you will visualize and inspect correctly processed output data so that you can become familiar with what the end product should look like. The exercise will take you through a variety of output, but is not necessarily the recommended procedure to take when trying to verify each subject. Some outputs are only necessary to check when there are problems or for a particular type of study. However it is a good idea for new users to become familiar with what the expected output should look like and how to view it. |
[[Tutorials|Back to list of all tutorials]] [[FsTutorial|Back to course page]] = Introduction to Freesurfer Output = In this exercise, you will visualize and inspect correctly processed output data so that you can become familiar with what the end product should look like. The exercise will take you through a variety of output, but is not necessarily the recommended procedure to take when trying to verify each subject for a real study. Some outputs are only necessary to check when troubleshooting, for example. However, it is a good idea for new users to become familiar with the variety of outputs and how to view them. -------- |
| Line 9: | Line 13: |
| Line 10: | Line 15: |
| setenv SUBJECTS_DIR $TUTORIAL_DATA/buckner_data/tutorial_subjs | export SUBJECTS_DIR=$TUTORIAL_DATA/buckner_data/tutorial_subjs |
| Line 13: | Line 18: |
| ''To copy: Highlight the command in the box above, right click and select copy (or use keyboard shortcut Ctrl+c), then use the middle button of your mouse to click inside the terminal window (this will paste the command). Press enter to run the command.'' These two commands set the SUBJECTS_DIR variable to the directory where the data is stored and then navigates into this directory. You can now skip ahead to the tutorial (below the gray line). |
---- ''To copy: Highlight the command in the box above, right click and select copy (or use keyboard shortcut Ctrl+c), then use the middle button of your mouse to click inside the terminal window to paste (or use the keyboard shortcut Ctrl+Shift+v).Press enter to run the command.'' These two commands set the {{{SUBJECTS_DIR}}} variable to the directory where the data is stored and then navigates into this directory. You can now skip ahead to the tutorial (below the gray line). |
| Line 16: | Line 22: |
| If you are '''NOT''' taking one of the formally organized courses, then to follow this exercise exactly be sure you've downloaded the [[FsTutorial/Data|tutorial data set]] before you begin. If you choose not to download the data set you can follow these instructions on your own data, but you will have to substitute your own specific paths and subject names. These are the commands that you need to run before getting started: | If you are '''NOT''' taking one of the formally organized courses, then to follow this exercise exactly be sure you've downloaded the [[FsTutorial/Data|tutorial data set]] before you begin. If you choose not to download the data set you can follow these instructions on your own data, but you will have to substitute your own data paths and subject names. These are the commands that you need to run before getting started: |
| Line 18: | Line 25: |
| tcsh source your_freesurfer_dir/SetUpFreeSurfer.csh setenv SUBJECTS_DIR $TUTORIAL_DATA/buckner_data/tutorial_subjs |
<source_freesurfer> export TUTORIAL_DATA=<path_to_your_tutorial_data> export SUBJECTS_DIR=$TUTORIAL_DATA/buckner_data/tutorial_subjs |
| Line 23: | Line 30: |
| Notice the command to open tcsh. If you are already running the tcsh command shell, then the 'tcsh' command is not necessary. If you are not using the tutorial data you should set your {{{SUBJECTS_DIR}}} to the directory in which the recon(s) of the subject(s) you will use for this tutorial are located. | |
| Line 25: | Line 31: |
| == Viewing Volumes with Tkmedit == Output volumes can be loaded into tkmedit, along with surface outlines and the subcortical segmentation. With one command line, you can load in the brainmask.mgz and wm.mgz volumes, the rh.white and lh.white surfaces (outlines), and the subcortical segmentation. Copy and paste the command below inside the terminal window: |
== Viewing Volumes with Freeview == With one Freeview command line, you can load several output volumes, such as brainmask.mgz and wm.mgz; the surfaces, rh.white and lh.white; and the subcortical segmentation, aseg.mgz. Copy and paste the command below inside the terminal window and press enter: |
| Line 29: | Line 37: |
| freeview -v good_output/mri/T1.mgz good_output/mri/wm.mgz:colormap=heat:opacity=0.4 \ good_output/mri/brainmask.mgz good_output/mri/aseg.mgz:colormap=lut:opacity=0.2 \ -f good_output/surf/lh.white:edgecolor=blue good_output/surf/lh.pial:edgecolor=red \ good_output/surf/rh.white:edgecolor=blue good_output/surf/rh.pial:edgecolor=red \ |
freeview -v \ good_output/mri/T1.mgz \ good_output/mri/wm.mgz \ good_output/mri/brainmask.mgz \ good_output/mri/aseg.mgz:colormap=lut:opacity=0.2 \ -f good_output/surf/lh.white:edgecolor=blue \ good_output/surf/lh.pial:edgecolor=red \ good_output/surf/rh.white:edgecolor=blue \ good_output/surf/rh.pial:edgecolor=red |
| Line 34: | Line 47: |
| '''NOTE''': The backslash allows you to copy and paste multiple lines of code as one command (otherwise, separating the command onto different lines tells Linux they are different commands to be run separately). We use the backslash throughout the tutorials to display the commands in a more easy-to-read manner, while still allowing you to copy and paste. When you are done with the course & do not need to copy and paste from the tutorials, the backslash is not necessary to make the command work. |
|
| Line 36: | Line 51: |
| * good_output : name of subject * brainmask.mgz : skull-stripped volume primarily used for troubleshooting (found in $SUBJECTS_DIR/good_output/mri). * T1.mgz : pre-skull-stripped volume loaded as 2nd volume (in $SUBJECTS_DIR/good_output/mri) * surf/lh.white and surf.lh.pial : loads the white and pial surfaces for the left hemisphere in different colors * aseg.mgz : loads automatic volume segmentation with the freesurfer lookup color table You should see a freeview window open:<<BR>> (use your middle mouse button to zoom and click with the middle mouse button to move the volume around to match the snapshot below<<BR>><<BR>> {{attachment:output_1.png}} <<BR>> You can use the {{attachment:viewingoptions.jpg}} buttons at the top to change between the different viewing options. You can also use these buttons {{attachment:sliceoptions.jpg}} to change which orthagonal view appears in the main viewing window. You are currently looking at the brainmask.mgz with the surfaces displayed and the aseg.mgz (subcortical segmentation) overlayed. The pial (red line), and white (blue line) surfaces are shown. You can toggle between the brainmask.mgz and the T1.mgz by clicking the checkmark next to the brainmask.mgz volume in the menu on the left, effectively turning off the brainmask.mgz and allowing the T1.mgz to show through. you can also use the up and down arrows on the top right of the menu to move the aseg.mgz down below the brain mask and move the wm.mgz up above so that it can be overlayed on top of the brainmask. the menu should look like this: <<BR>> {{attachment:menu_wm.jpg}} <<BR>> |
* good_output is the name of the subject * The flag -v is used to open some of the most commonly used volumes including: * brainmask.mgz : skull-stripped volume primarily used for troubleshooting * wm.mgz : white matter mask also used for troubleshooting * aseg.mgz : subcortical segmentation loaded with its corresponding color table and at a low opacity. For more information on the subcortical segmentation, see [[SubcorticalSegmentation|here]]. * The flag -f is used to load surfaces * white & pial surfaces are loaded for each hemisphere & with color indicated by 'edgecolor' After hitting enter, a Freeview window should open showing you the outputs you specified: {{attachment:good_output_slice128_crop.png}} <<BR>> The menu on the left shows which files have been loaded. Use the {{attachment:sliceoptions.jpeg}} buttons at the top to change which orthogonal view appears in the main viewing window. Let's go with coronal for now. You can also use the {{attachment:viewingoptions.jpeg}} buttons to change the organization of the viewing panes. To change which brain slice you are viewing, use the 'Page Up' or 'Page Down' keys on your keyboard or the up and down arrows. (Mac users: press the fn key while using the up and down arrows.) While Freeview can load many volumes at once, you cannot necessarily see them all at once. You are able to see whichever volume is at the top of the list in the menu on the left. An exception to this are volumes such as the wm.mgz and aseg.mz which can be made translucent, allowing you to view the information they contain simultaneously with the volume directly below it on the list. For example, you are currently seeing information from both the aseg (labeled structures) and the brainmask (voxel intensities). You can hide or turn off a layer by unchecking the check box next to the layer name. Try this out - uncheck the box next to 'aseg'. Now you can see just the brainmask. You can also use the up and down arrows (located below the menu on the left) to move the aseg down on the list, below the brainmask (try it!). Let's now move the wm volume to the top of the list but instead of using the arrows, try this shortcut: double click on where it says 'wm'. It should automatically move to the top. The menu should now look like this: <<BR>> {{attachment:Menu.png}} <<BR>> |
| Line 52: | Line 76: |
| {{attachment:wm_overlay.jpg}} {{attachment:icon_aux_volume.gif}} and {{attachment:icon_main_volume.gif}} . As you switch between these two buttons, notice that at the top of the display window, the asterisks (**) surround the name of the volume you are currently looking at. . '''Keyboard Shortcut''': Alt-c will allow you to quickly switch back and forth between the two volumes instead of clicking between these buttons. If you hover your mouse over a button in the Tkmedit Tools window, a pop-up will tell you what it does and its keyboard shortcut. When the Navigation button {{attachment:icon_navigate.gif}} is chosen, you can drag the brain around in the display window. Try it out. Notice how you are not able to move around the cursor (the little red cross-hair). . To change the location of the cursor, choose any button to the right of the Navigation button and then left-click in the display window. Notice the cursor move to wherever you click. When you zoom, it will zoom into the location of the cursor. When you change brain orientation (to axial or sagittal), you will be viewing the slice where the cursor was located in that plane. To change which brain slice you are viewing, you can use the + or - buttons next to where it says "Slice". . '''Keyboard Shortcut''': Use the Up or Down arrows on your keyboard to change slices faster (this will only work when the Display window is selected and not on the Tools window). |
{{attachment:wm_mask.jpeg||width="434",height="363"}} . '''Keyboard Shortcut''': Alt+c will allow you to quickly cycle through all the layers. Every time you hit it, the volume at the top of the list will move to the bottom of the list. Mac users, all Freeview keyboard shortcuts are located [[MacCommands|here]]. When the Navigation button {{attachment:nav.jpeg}} is chosen, you can move the image in the viewing window around by holding down the middle mouse button and dragging the mouse where you want the image to go. Try it out. To zoom, scroll with the middle mouse button. In this navigation mode, notice the cursor (little red crosshair) moves to wherever you left click. When you change the orientation (to axial or sagittal), you will be viewing the slice that intersects with the cursor's location. To illustrate this point, if you are in the viewing pane selected here: {{attachment:viewingoptions.jpeg}} You'll notice all the planes will shift based on where you move the cursor. One other important thing to note is that any action you do in the viewing window (i.e. erasing, changing brightness, etc.) will take place on whichever volume is currently highlighted in the left menu, regardless of which file is at the top of the list. |
| Line 61: | Line 89: |
| Line 63: | Line 92: |
| Line 64: | Line 94: |
| Toggle to the brainmask volume, if not already in view, by using the {{attachment:icon_main_volume.gif}} button or Alt-c. The white surface (yellow line) is used to calculate total white matter volume and should accurately follow the boundary between white matter and gray matter. The pial surface is used to calculate cortical gray matter volume and should accurately follow the boundary between the gray matter and the CSF. ''Tip: It may be easier to concentrate on the surfaces if you toggle off the aseg with the {{attachment:icon_seg_volume.gif}} button.'' . '''Keyboard Shortcut''': Ctrl-g will also turn off the aseg. As you scroll through the slices checking the surfaces, keep in mind that you are looking at a 2-dimensional rendering of a 3-dimensional image - be sure to look at more than just one view (i.e., sagittal, coronal and horizontal). To check your surfaces, toggle them off and on with {{attachment:icon_pial_surface.gif}} for the pial surface and {{attachment:icon_main_surface.gif}} for the white surface. Would you draw the boundary in the same location? Adjust the brightness and contrast so you can see the shift in intensity between gray and white. You can do this by going to '''View > Configure > Brightness/Contrast''' in the Tkmedit Tools window and then moving the sliders to adjust the levels. . '''Keyboard Shortcut''''''s''': You can also use Ctrl-p and Cltr-m to turn on and off the pial and white surfaces. . If the Tkmedit Tools window is highlighted, Ctrl+b will open the Brightness/Contrast window. Alternatively, you can hold down the shift button and drag the left mouse button in the display window and this will change the brightness/contrast without using the sliders. |
Double click on 'brainmask' in the left menu to bring it to the top of the volume list. The white surface (blue line) is used to calculate total white matter volume and should accurately follow the boundary between white matter and gray matter. The pial surface (red line) is used to calculate cortical gray matter volume and should accurately follow the boundary between the gray matter and the CSF. As you scroll through the slices checking the surfaces for accuracy, keep in mind that you are looking at a 2-dimensional rendering of a 3-dimensional image - be sure to look at more than just one view (i.e., sagittal, coronal and horizontal). You can turn the surfaces off and on by checking and unchecking them in the left menu under where it says 'Surfaces'. As you do this, ask yourself: would you draw the boundary in the same location? . '''Keyboard Shortcut''': Alt+f will turn on and off whichever surface is highlighted in the menu window. To help verify accuracy, adjust the brightness and contrast so you can easily identify the shift in intensity between gray and white matter. To do this, left click on the image while holding down the 'Shift' key and drag your mouse. (Make sure the brainmask volume is highlighted in the left menu in order for this to work.) The other way to do this is via the 'Window' and 'Level' sliders underneath the left menu. |
| Line 71: | Line 103: |
| Line 72: | Line 105: |
| * For an example of this, see coronal slice 137 (enter 137 into the box next to where it says "Slice" and hit enter). * Along the midline cut, it is possible to see some overlapping of the surfaces from one hemisphere to another. The medial wall is not included in the cortical measures so this can generally be ignored. |
* For an example of this, scroll to coronal slice 128 (slice numbers appear in the upper right hand corner of the viewing window). ## * Along the midline cut, it is possible to see some overlapping of the surfaces from one hemisphere to another. The medial wall is not included in the cortical measures so this can generally be ignored. |
| Line 75: | Line 109: |
| Toggle on the subcortical segmentation with the {{attachment:icon_seg_volume.gif}} button or Ctrl-g. This will show the complete segmentation of the subcortical structures. Each structure is labeled with a unique color/number distinction. If you click on a voxel the structures name and number label will be shown in the Tkmedit Tools window (under where it says "Cursor"). Toggle the aseg on and off to make sure the aseg is accurately following the underlying intensity boundaries of each structure. Scrolling through the slices you will be able to see that everything is labeled, and done so accurately. Sometimes it is easier to see the structures and their boundaries looking in either the sagittal or horizontal view, so be sure to check around in all of them. If you hold down the Ctrl button and left click on the {{attachment:icon_seg_volume.gif}} button, a window will pop up that will allow you to adjust the segmentation opacity. === Other Things To Do in Tkmedit === |
Uncheck all of the surfaces. Then check the box next to the aseg volume and double click it. The aseg volume will jump to the top of the left menu, above the brainmask volume. <<BR>><<BR>> {{attachment:good_output_5.3_sidebar_3.png||width="310",height="425"}} <<BR>> This will show the complete segmentation of the subcortical structures. {{attachment:good_output_nosurf.jpg||width="435",height="423"}} Each structure is labeled with a unique color/number distinction. If you click on a voxel the structure's name and number label will be shown in the 'Cursor' section under the viewing window next to the word, 'aseg'. If you hover over a voxel where the cursor is not located, the value of that voxel will appear under the 'Mouse' section. . '''Keyboard Shortcut''': Alt+v will turn on and off the layer that is currently highlighted. Make sure 'aseg' is highlighted in the left menu and press Alt+v to turn it off and on. While doing this, make sure the aseg is accurately following the underlying intensity boundaries of each structure. You can also adjust the 'Opacity' slider to better see the underlying brainmask. . '''Keyboard Shortcut''': Alt+a and Alt+s will change the opacity of the layer that is currently highlighted. === Other Things To Do in Freeview === |
| Line 78: | Line 123: |
| ==== Aparc+Aseg segmentation ==== To load the aparc+aseg segmentation you can go to '''File > Load Segmentation''' and browse to the {{{aparc+aseg.mgz}}}. Hit '''OK''' once you have selected the file and then '''OK''' again in the Load Segmentation window. When loaded, it will look like this: {{attachment:aparc_aseg.jpg}} This segmentation shows the same subcortical structures that are labeled in the aseg.mgz, but also displays the cortical parcellation labels in the volume (later we will look at the labels on the surface). Click around the cortex to see the name of each cortical region in the Tools window. The aparc+aseg.mgz uses the Desikan-Killiany atlas. To see the Destrieux atlas, you would load the aparc.a2009s+aseg.mgz |
|
| Line 83: | Line 125: |
| Turn off the segmentation (Ctrl-g) and scroll through the brainmask volume. Notice that there is no skull left in your image. Notice also that the cerebellum is still included in the volume. You should not see any large areas of skull left behind, or any areas of cortex or cerebellum removed from this volume. You can toggle between the brainmask.mgz volume and the non-skull-stripped, T1.mgz volume using Alt-c to ensure that the skullstrip has worked properly. In the TroubleshootingData tutorial, we'll go over what to do if there was a skull strip error. | Close the aseg. As you scroll through the brainmask volume, notice that there is no skull left in your image. You should also not see any regions of cortex or cerebellum missing from this volume. Bring the T1.mgz to the top of the volume list and toggle between it and the brainmask.mgz volume (Alt+v) to verify that the skullstrip has worked properly. In the [[FsTutorial/TroubleshootingData|TroubleshootingData]] tutorial, we'll go over what to do if there was a skull strip error. |
| Line 85: | Line 128: |
| Scroll through the brainmask volume and notice that the intensity is all uniform. You should not see any very bright or very dark spots in the white matter or gray matter. If you click on a voxel in the white matter, you can see that it has been normalized to an intensity of (or very close to) 110 in the Tkmedit Tools Window (under Cursor, next to where it says "brainmask.mgz val"). When wm voxels are not close to 110, they may be erroneously excluded from the white surface. In the TroubleshootingData tutorial, we'll go over what to do if there was an intensity normalization error. | Scroll through the brainmask volume and notice that the intensity is uniform throughout. You should not see any very bright or very dark spots in the white matter or gray matter. If you click on a voxel in the white matter, you can see that it has been normalized to an intensity of (or close to) 110 (look under the Cursor section next to where it says 'brainmask'). When wm voxels are far from a value of 110, they may be erroneously excluded from the white surface. By "close to," we mean wm voxels have an intensity value of somewhere between 100 and 110. By "far from," we mean wm voxels are between a value of 85 and 100. In the [[FsTutorial/TroubleshootingData|TroubleshootingData]] tutorial, we'll go over what to do if there is an intensity normalization error. |
| Line 87: | Line 131: |
| To check the wm volume you should load it in as a new aux volume. To do this go to ''' File > Aux Volume > Load Aux Volume ''' and browse to {{{wm.mgz}}}. This should open: {{attachment:wm.jpg}} This volume is !FreeSurfer's initial segmentation of the white matter (shown in shades of gray) with additions from the automatic topology fixer (in white). This "mask" is the starting point for the white surface which grows out from here and stops at a more accurate location along the wm/gm boundary using the intensity gradients in the brainmask.mgz volume as a guide. The wm.mgz can be used to add missing wm voxels or delete voxels that are not wm but were included in the surface. In the TroubleshootingData tutorial, we'll go over what to do if there was a wm segmentation error. You can now close Tkmedit by hitting the '''X''' on the display window. You can also use Ctrl-q to close it. == Viewing Surfaces with Tksurfer == Now that you've checked out everything in the volume using tkmedit, you can close it and begin to inspect your data on the surface. For this, you will use tksurfer. Tksurfer displays one hemisphere at a time. This exercise will go through visualizing things on the left hemisphere only, but everything works the same on the right hemisphere (except in the Tksurfer command, you would specify rh instead of lh). Here are the things you can look at with tksurfer: |
Recheck all of the surfaces and then double click on the wm volume to bring it to the top of the list. This volume is !FreeSurfer's initial segmentation of the white matter (shown in gray) with additions from the automatic topology fixer (in white). This "mask" is the starting point for the white surface which grows out from here and stops at a more accurate location using the intensity gradients in the brainmask.mgz volume as a guide. The wm.mgz can be used to add missing wm voxels or delete voxels that are not white matter but were included in the surface. In the [[FsTutorial/TroubleshootingDataV6.0|TroubleshootingData]] tutorial, we'll go over how to do this and when. For now, it will be good to learn how to change the wm mask to a heat overlay for ease of editing. The "heat" setting is used for editing because it allows us to be able to see the underlying anatomy, while still being able to locate inaccuracies in the wm.mgz "mask." You can also use 'Jet' overlay, if you prefer. With wm highlighted in the left menu, take a look at the options next to Color Map and choose 'Heat' or 'Jet'. Then adjust the opacity so you can also see the brainmask underneath (down to around .25). It should look like this: {{attachment:Good_Output_Heat.png||width="435",height="423"}} This could have also be done via commandline when first loading the wm in Freeview if we used this command: {{{freeview -v wm.mgz:colormap=heat:opacity=0.25 brainmask.mgz}}} ('''Note: You don't need to run this command.''') You can now close Freeview by hitting the '''X''' on the display window or Ctrl-q. == Viewing Surfaces in 3D using Freeview == We're now going to view several surface overlays. You could view the volumes discussed above and the overlays discussed below all in one Freeview session. They are separated in this tutorial only for simplicity. The examples below are displayed only on the left hemisphere, however, you could also view just the right hemisphere or both hemispheres at the same time. Here are some surfaces you can look at with Freeview: |
| Line 95: | Line 143: |
| * sulc and curv curvature files | * sulcal and curvature maps |
| Line 98: | Line 146: |
| To open Tksurfer with the left hemisphere inflated surface of your subject, '''open a new terminal window''', then use the following command: | You can load them all in Freeview with the command below (be patient while they all load): |
| Line 101: | Line 151: |
| setenv SUBJECTS_DIR $TUTORIAL_DATA/buckner_data/tutorial_subjs cd $SUBJECTS_DIR tksurfer good_output lh inflated |
freeview -f good_output/surf/lh.pial:annot=aparc.annot:name=pial_aparc:visible=0 \ good_output/surf/lh.pial:annot=aparc.a2009s.annot:name=pial_aparc_des:visible=0 \ good_output/surf/lh.inflated:overlay=lh.thickness:overlay_threshold=0.1,3::name=inflated_thickness:visible=0 \ good_output/surf/lh.inflated:visible=0 \ good_output/surf/lh.white:visible=0 \ good_output/surf/lh.pial \ --viewport 3d |
| Line 106: | Line 160: |
| You should see a Tksurfer window open up to this: <<BR>> {{attachment:tksurfer.jpg}} You are currently looking at the inflated surface. The surface can be rotated using the buttons in the navigation toolbar: {{attachment:icon_arrow_rot_x_pos.gif}} {{attachment:icon_arrow_rot_z_neg.gif}} {{attachment:icon_arrow_rot_y_neg.gif}} {{attachment:icon_arrow_rot_x_neg.gif}} {{attachment:icon_arrow_rot_y_pos.gif}} {{attachment:icon_arrow_rot_z_pos.gif}} . Use the redraw button {{attachment:icon_redraw.gif}} to repaint the image if it gets corrupted by window movement. . '''Mouse Shortcut''': Right click in the Tksurfer window to redraw. '''Inflated surface ''' The inflated surface is good to look at when checking to see if you need to make edits to the wm.mgz volume. You'll notice as you inspect this surface that it is smooth and free from holes, bumps and other defects. If you click on the surface, you will see the coordinates of the vertex you clicked on in the Tools window under "Cursor". To clear the marks made on the surface after clicking on it, you can go to Edit > Unmark All Vertices. . '''Keyboard Shortcut''': You can unmark one vertex at a time by using Ctrl+Shift+middle click on each. '''Troubleshooting Tip''': If at any point clicking in the Tksurfer window automatically causes you to zoom in, your Ctrl key is stuck. Trying hitting the Ctrl button a few times to get it unstuck. ''' Pial Surface ''' All surfaces (pial, white, orig) have been loaded as a default along with the inflated surface. You can switch to the pial surface by clicking the {{attachment:icon_pial_surface.gif}} button. You should see this: {{attachment:pial.jpg}} The pial surface is showing you the outer boundary between the gray matter and CSF (cerebrospinal fluid). This is the same file that was viewed in Tkmedit, just represented as a 3D surface image rather than the red outline on the 2D slices in the brainmask volume. You can inspect this surface by rotating it around as you wish. ''' White Surface ''' Click on the {{attachment:icon_white_surface.gif}} button to view the white surface. This is what the white surface will look like: {{attachment:white.jpg}} The white surface shows the boundary between the white and the gray matter. Again, this is the same file that was viewed in Tkmedit (as the yellow outline) just represented in a 3D manner. You can inspect this surface by rotating it around as you wish. '''Curv and Sulc Files ''' Switch back to viewing the inflated surface of the brain by pushing the {{attachment:TkSurferGuide/TkSurferGeneralUsage/TkSurferInterface/icon_surface_inflated.gif}} button. You can now load in the curvature file, lh.curv, by holding Ctrl and right clicking on the {{attachment:icon_curv.gif}} button on the Tksurfer Tools window. The box that pops up will automatically have selected the lh.curv file, so click ok. The curvature file will look like this: {{attachment:curv.jpg}} This is showing the slightly smoothed mean curvature. It has the units of 1/mm, and with an outward pointing normal vector field. Negative regions are folded-out and shown in green (gyral), and positive regions are folded-in and shown in red (sulcal) To view the sulc file you could have changed the dialog box to say lh.sulc when right clicking on the curv button as described above, or you can go to '''File > Curvature > Load Curvature''' and browse to the {{{lh.sulc file}}} (found in {{{$TUTORIAL_DATA/buckner_data/tutorial_subjs/good_output/surf/}}}). Be sure you select the curvature file for the correct hemisphere, if you select the wrong one it will not look right. The lh.sulc file will load a slightly different display of green/red values than the lh.curv. These are showing the sulcal depth and again here the red regions are sulcal and the green regions are gyral. You can still view this overlay as you switch to the pial or white surfaces using the {{attachment:icon_pial_surface.gif}} and {{attachment:icon_white_surface.gif}} buttons. '''Thickness Maps''' To view the thickness maps it is probably best to toggle off the curvature {{attachment:icon_curv.gif}} . You can load the thickness map, lh.thickness, by holding Ctrl and right clicking {{attachment:icon_overlay.gif}} on the Tksurfer Tools window. Browse to the lh.thickness file (you may have to find the subject "good_output" from the list of subjects, then navigate to the {{{surf}}} directory and select {{{lh.thickness}}}). Be sure you select the thickness file for the correct hemisphere, if you select the wrong one it will not look right. The lh.thickness map should open up and look like this: {{attachment:lh.thickness.jpg}} You can adjust the thresholds of the map by going to ''' View > Configure > Overlay''' which will open a new window that will allow you to change the thresholds. First click the '''Thresholds: Linear''' checkbox. Then try some different settings and see how it affects the display on the map (try a Min of 1.0 and Max of 3.0, Min of 2 and Max of 5, etc). After you change the min and max values be sure to hit Apply to see the changes. If the Apply button is not visible to you, hit the space bar to Apply the changes. '''Cortical Parcellations''' To view the cortical parcellation it is probably best to toggle off the curvature {{attachment:icon_curv.gif}} and thickness files {{attachment:icon_overlay.gif}} (if any are still visible), and to switch to the pial surface, {{attachment:icon_pial_surface.gif}} . You can load the parcellation by going to '''File > Label > Import Annotation''' and browsing to the {{{lh.aparc.annot file}}} (found in {{{$TUTORIAL_DATA/buckner_data/tutorial_subjs/good_output/label/}}}). Be sure you select the label file for the correct hemisphere, if you select the wrong one it will not look right. The lh.aparc.annot should open up and like this: {{attachment:parcellation.jpg}} Click on a color and view the name of the cortical region in the Tksurfer Tools box. Rotate the brain so you are looking at the medial wall. Notice that all subcortical gray matter is not a part of the surface labels (because again, those areas do not count towards the cortical surface measures). You can also switch to the inflated view and turn the labels to outlines using the {{attachment:TkSurferGuide/TkSurferGeneralUsage/TkSurferInterface/icon_label_outline.gif}} button. The parcellation that is loaded here was created with the Desikan-Killiany atlas. By default there are two parcellations that are made when recon-all is run. The second parcellation, called ?h.aparc.a2009s.annot, is created with the Destrieux atlas. The difference is the number and designation of the areas that are labeled. You can load this second parcellation by first going to '''File -> Label -> Delete all Labels'''. This will remove the first parcellation. Then you can repeat the steps for loading a parcellation, this time browsing to lh.aparc.a2009s.annot to load the second parcellation. == Using Tkmedit and Tksurfer together == When you are viewing the same subject in Tkmedit and Tksurfer at the same time you can click on a point on the surface (in tksurfer) and automatically locate the same point in the volume (in tkmedit). To do this, first open a '''new''' terminal window so you can open up the same subject in Tkmedit as you have open in Tksurfer: ---- {{{ tkmedit good_output brainmask.mgz \ -aux T1.mgz -surfs -aseg }}} ---- Click on a location in Tksurfer. Next, click the save point button {{attachment:icon_cursor_save.gif}} in the Tksurfer Tools window. This will save the cursor position. Then, in the Tkmedit Tools window, click the "goto saved point" button {{attachment:icon_cursor_goto.gif}} . This will now bring you to the same point, only in the volume. Look for the new location of the cursor in Tkmedit. If you are having trouble finding it, the red lines on the edges of the Tkmedit display window will indicate which row and column it is located within. You can also click on a point in Tkmedit, save it using the {{attachment:icon_cursor_save.gif}} button and opening the same point in Tksurfer using the {{attachment:icon_cursor_goto.gif}} button. This technique is very useful when you see something wrong on the surface of a subject (in Tksurfer) and you want to see what is happening in the volume in that same place and vice versa. When you are done, you can close Tksurfer by going to '''File > Quit'''. You can close Tkmedit by hitting the '''X''' on the display window or going to '''File > Quit '''. You can also do Ctrl-q to quit for both. |
Some notes on the above command line: * {{{lh.pial:annot=aparc.annot}}} loads the Desikan-Killiany cortical parcellation on the pial surface. {{{lh.pial:annot=aparc.a2009s.annot}}} loads the Destrieux cortical parcellation on the pial surface. * {{{:name=pial_aparc:visible=0}}} changes which name shows up in the menu display and turns off this layer * {{{lh.inflated:overlay=lh.thickness:overlay_threshold=0.1,3}}} loads the thickness overlay on top of the inflated surface and sets the min and max thresholds to display '''Pial Surface'''<<BR>> The first volume you see is the pial surface. The pial surface here is the full 3D representation of the red surface you saw on each 2D slice of the brainmask volume, earlier in the tutorial. The green regions are gyri and the red regions are sulci. With this surface, the sulci are mostly hidden. Feel free to move the inflated brain around by left clicking on it and dragging the mouse. If you would like to put the brain back to its original state, go to '''View > Reset View''', press Ctrl+r, or click the Reset button: {{attachment:ResetButton.png}} {{attachment:lh.pial.jpeg||width="420",height="331"}} To get rid of the yellow lines being displayed on the surface (corresponding to the 3 slice views), right-click on the surface and check Hide All Slices, or hit Crtl+Shift+s. '''White Surface'''<<BR>> Press Alt+c to cycle to the white surface. {{attachment:lh.white.jpeg||width="423",height="334"}} The white surface shows the boundary between white matter and gray matter. It is the 3D representation of the blue surface you saw on the 2D slices of the brainmask. With this surface, we are able to see the sulci a bit better. You can inspect this surface by rotating it around as you wish. '''Inflated Surface'''<<BR>> Press Alt+c to cycle to the curvature on the inflated surface. With the inflated surface, you can fully see the sulci. If you look at the options next to 'Curvature' in the left menu pane, you can switch it to binary to see the curvature in grayscale. Or switch it to 'off' to see the smooth inflated surface. {{attachment:lh.curv.jpeg||width="426",height="336"}} The inflated surface can be helpful to find bumps, holes, or other defects that may need to be corrected. If you click on the inflated surface, you will see the coordinates of the vertex you clicked on in the 'Cursor' window. '''Thickness Map'''<<BR>> Press Alt+c to cycle to the thickness map on the inflated surface. {{attachment:lh_thick.jpeg||width="427",height="337"}} '''Cortical Parcellation'''<<BR>> Press Alt+c to cycle to the cortical parcellations. On the left is the Desikan-Killiany parcellation and on the right is the Destrieux parcellation. {{attachment:good_output_aparc_crop.png||width="540",height="339"}} {{attachment:DestrieuxAtlas.png||width="490",height="339"}} Click on a color and view the name of the cortical region in the 'Cursor' or 'Mouse' windows next to where it says 'aparc.annot'. Rotate the brain so you are looking at the medial wall. Notice that all subcortical gray matter is not a part of the surface labels (because again, those areas do not count towards the cortical surface measures). By default there are two parcellations that are made when recon-all is run. The two parcellations are the ?h.aparc.annot, created with the Desikan-Killiany atlas, and the ?h.aparc.a2009s.annot, created with the Destrieux atlas. The difference is the number and designation of the areas that are labeled. You can load the Destrieux parcellation by clicking on the drop down box next to 'Annotation' on the left panel and choosing '''Load from file...'''. Browse to lh.aparc.a2009s.annot and hit 'Open'. ---- == Summary == By the end of this exercise, you should know: * How to visualize and inspect !FreeSurfer data * The command to visualize data in Freeview * What to look for when visualizing data including that surfaces follow the gray and white matter boundaries and that the aseg.mgz accurately follows the subcortical intensity boundaries * The regions around the hippocampus and amygdala are not intended to be accurate and these inaccuracies can be ignored as subcortical regions are excluded from cortical measures * Surfaces can be viewed in 3D such as the pial, white, and inflated surfaces, sulcul and cortical maps, thickness maps, and cortical parcellation. This tutorial was meant as an introduction to Freeview. For information on buttons or menu options not covered here, you can find out about them on the FreeviewGuide wiki. ---- === Exercise 1 === '''Difficulty:''' Beginner '''Goal:''' Practice basic Freeview tasks. In the examples above you looked at data from a subject called “good_output”. For this challenge complete the following tasks for subject “004”. 1. Open the subject’s aparc+aseg.mgz volume with a colormap of “lut”. 1. Swap the view to sagittal 1. Navigate with the arrow keys to find the right putamen '' Need a hint? '' . Here is how you opened up a similar volume for the “good_output” subject: {{{ freeview -v good_output/mri/aseg.mgz:colormap=lut }}} . Please note that we were in the $TUTORIAL_DATA/buckner_data/tutorial_subjs directory when we used that command - so {{{ cd }}} there if you'd like to base your command off the above example. Want to know the answer? Click and drag to highlight and reveal the text below. ||<#000000> cd $TUTORIAL_DATA/buckner_data/tutorial_subjs || ||<#000000>freeview -v 004/mri/aparc+aseg.mgz:colormap=lut || === Exercise 2 === '''Difficulty:''' Beginner '''Goal:''' Practice visualizing data with overlays. 1. Open 004’s lh.pial surface, with the overlay named lh.thickness, set the overlay to display with a threshold of 1,2 1. Look up vertex 141813 1. What is the thickness and label of this vertex? '' Need a hint? '' . Here is how you opened up a similar surface for the good_output subject, with thickness information: {{{ freeview -f good_output/surf/lh.inflated:overlay=lh.thickness:overlay_threshold=0.1,3 --viewport 3d }}} . And here is how you opened up a similar surface for the good_output subject with the Desikan-Killany parcellation: {{{ freeview -f good_output/surf/lh.pial:annot=aparc.annot }}} . Please note that we were in the $TUTORIAL_DATA/buckner_data/tutorial_subjs directory when we used that command - so {{{ cd }}} there if you'd like to base your command off the above example. Want to know the answer? Click and drag to highlight and reveal the text below. ||<#000000> cd $TUTORIAL_DATA/buckner_data/tutorial_subjs || ||<#000000>freeview -f 004/surf/lh.pial:overlay=lh.thickness:overlay_threshold=1,2 --viewport 3d || === Exercise 3 === '''Difficulty:''' Beginner '''Goal:''' Practice opening multiple files at a time with FreeView. . For this challenge start with this terminal command: {{{ freeview -v 004/mri/wm.mgz:colormap=jet 004/mri/brainmask.mgz -f 004/surf/lh.pial:edgecolor=blue 004/surf/lh.white:edgecolor=red }}} * Right now it only opens the left hemisphere pial and white matter surfaces, alter it to open both for the right hemisphere as well, with colors that match the left hemisphere side. * Once you have the last command working, rearrange the volume layers in freesurfer so that the wm.mgz is at %20 opacity and the brainmask can be seen underneath it (this can also be done through altering the terminal command - you can choose which way to do so). * You will need to be in $TUTORIAL_DATA/buckner_data/tutorial_subjs for the command to work, so cd there if needed Want the solution? Click and drag to highlight and reveal the text below. ||<#000000> cd $TUTORIAL_DATA/buckner_data/tutorial_subjs || ||<#000000>freeview -v 004/mri/brainmask.mgz 004/mri/wm.mgz:colormap=jet:opacity=.2 -f 004/surf/lh.pial:edgecolor=blue 004/surf/lh.white:edgecolor=red 004/surf/rh.pial:edgecolor=blue 004/surf/rh.white:edgecolor=red || === Exercise 4 === '''Difficulty:''' Intermediate - assumes some comfort with navigating Unix and FreeView '''Goal:''' Export a series of images from FreeView and stitch them together to create a GIF. 1. Open up any surface from the tutorial data 1. Set the viewport to 3d view, right click in the viewport and select {{{ Hide All Slices }}} 1. In the {{{ File }}} menu, select {{{ Save Movie Frames }}} 1. Set up the options as in the following picture - you will likely want to create a new directory in your home directory to save the output to. {{attachment:MovieSetup.png||width="600"}} 1. In a terminal, navigate to the new directory you output the movie data to. 1. Run this command: {{{ convert -delay .1 *.png brainanim.gif }}} * Note: convert is from the ImageMagick library, this is setup on the course computers. If you are doing the tutorials from home you can get a copy of ImageMagick here https://imagemagick.org/index.php * {{{ -delay }}} determines the gap between frames, {{{ *.png }}} selects all png files in the working directory, {{{ brainanim.gif }}} is the output name. 1. To view your GIF, open it with firefox {{{ firefox brainanim.gif }}} {{attachment:brainanim.gif||width="300"}} ---- == Quiz == You can test your knowledge of this tutorial by [[https://forms.gle/mNryhwtiJDR53y17A|clicking here]] for a quiz! |
| Line 147: | Line 297: |
| This tutorial was meant as an introduction to Tkmedit and Tksurfer. For information on buttons or menu options not covered here, you can find out about them on the [[FsTutorial/Tools|Freesurfer Tools]] wiki. [[FsTutorial|top]] | [[FsTutorial|previous]] | [[FsTutorial/TroubleshootingData|next]] |
[[Tutorials|Back to list of all tutorials]] [[FsTutorial|Back to course page]] |
Introduction to Freesurfer Output
In this exercise, you will visualize and inspect correctly processed output data so that you can become familiar with what the end product should look like. The exercise will take you through a variety of output, but is not necessarily the recommended procedure to take when trying to verify each subject for a real study. Some outputs are only necessary to check when troubleshooting, for example. However, it is a good idea for new users to become familiar with the variety of outputs and how to view them.
Preparations
If You're at an Organized Course
If you are taking one of the formally organized courses, everything has been set up for you on the provided laptop. The only thing you will need to do is run the following commands in every new terminal window (aka shell) you open throughout this tutorial. Copy and paste the commands below to get started:
export SUBJECTS_DIR=$TUTORIAL_DATA/buckner_data/tutorial_subjs
cd $SUBJECTS_DIR
To copy: Highlight the command in the box above, right click and select copy (or use keyboard shortcut Ctrl+c), then use the middle button of your mouse to click inside the terminal window to paste (or use the keyboard shortcut Ctrl+Shift+v).Press enter to run the command. These two commands set the SUBJECTS_DIR variable to the directory where the data is stored and then navigates into this directory. You can now skip ahead to the tutorial (below the gray line).
If You're not at an Organized Course
If you are NOT taking one of the formally organized courses, then to follow this exercise exactly be sure you've downloaded the tutorial data set before you begin. If you choose not to download the data set you can follow these instructions on your own data, but you will have to substitute your own data paths and subject names. These are the commands that you need to run before getting started:
<source_freesurfer>
export TUTORIAL_DATA=<path_to_your_tutorial_data>
export SUBJECTS_DIR=$TUTORIAL_DATA/buckner_data/tutorial_subjs
cd $SUBJECTS_DIR
Viewing Volumes with Freeview
With one Freeview command line, you can load several output volumes, such as brainmask.mgz and wm.mgz; the surfaces, rh.white and lh.white; and the subcortical segmentation, aseg.mgz. Copy and paste the command below inside the terminal window and press enter:
freeview -v \
good_output/mri/T1.mgz \
good_output/mri/wm.mgz \
good_output/mri/brainmask.mgz \
good_output/mri/aseg.mgz:colormap=lut:opacity=0.2 \
-f good_output/surf/lh.white:edgecolor=blue \
good_output/surf/lh.pial:edgecolor=red \
good_output/surf/rh.white:edgecolor=blue \
good_output/surf/rh.pial:edgecolor=red
NOTE: The backslash allows you to copy and paste multiple lines of code as one command (otherwise, separating the command onto different lines tells Linux they are different commands to be run separately). We use the backslash throughout the tutorials to display the commands in a more easy-to-read manner, while still allowing you to copy and paste. When you are done with the course & do not need to copy and paste from the tutorials, the backslash is not necessary to make the command work.
Some notes on the above command line:
- good_output is the name of the subject
- The flag -v is used to open some of the most commonly used volumes including:
- brainmask.mgz : skull-stripped volume primarily used for troubleshooting
- wm.mgz : white matter mask also used for troubleshooting
aseg.mgz : subcortical segmentation loaded with its corresponding color table and at a low opacity. For more information on the subcortical segmentation, see here.
- The flag -f is used to load surfaces
white & pial surfaces are loaded for each hemisphere & with color indicated by 'edgecolor'
After hitting enter, a Freeview window should open showing you the outputs you specified:
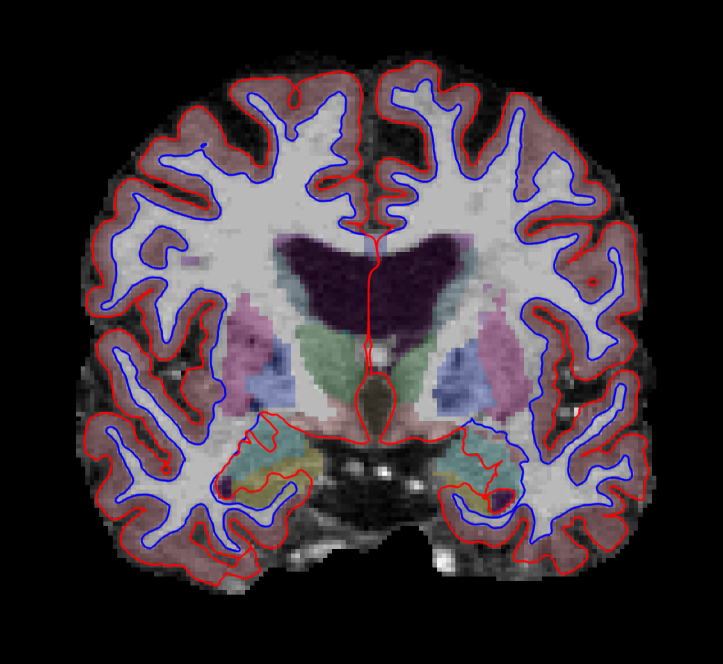
The menu on the left shows which files have been loaded.
Use the  buttons at the top to change which orthogonal view appears in the main viewing window. Let's go with coronal for now. You can also use the
  buttons to change the organization of the viewing panes. To change which brain slice you are viewing, use the 'Page Up' or 'Page Down' keys on your keyboard or the up and down arrows. (Mac users: press the fn key while using the up and down arrows.)
While Freeview can load many volumes at once, you cannot necessarily see them all at once. You are able to see whichever volume is at the top of the list in the menu on the left. An exception to this are volumes such as the wm.mgz and aseg.mz which can be made translucent, allowing you to view the information they contain simultaneously with the volume directly below it on the list. For example, you are currently seeing information from both the aseg (labeled structures) and the brainmask (voxel intensities).
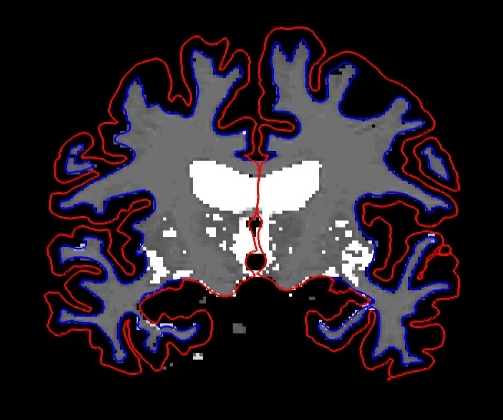
You can hide or turn off a layer by unchecking the check box next to the layer name. Try this out - uncheck the box next to 'aseg'. Now you can see just the brainmask. You can also use the up and down arrows (located below the menu on the left) to move the aseg down on the list, below the brainmask (try it!). Let's now move the wm volume to the top of the list but instead of using the arrows, try this shortcut: double click on where it says 'wm'. It should automatically move to the top. The menu should now look like this:
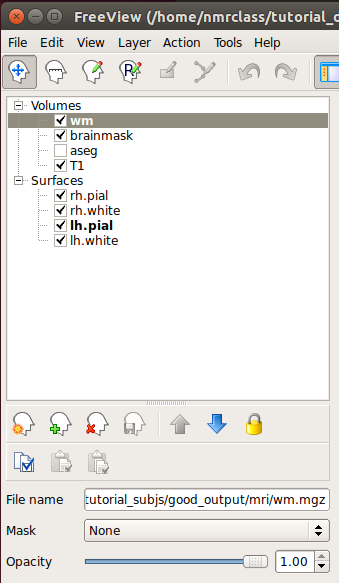
and the viewing window should look like this:
Keyboard Shortcut: Alt+c will allow you to quickly cycle through all the layers. Every time you hit it, the volume at the top of the list will move to the bottom of the list. Mac users, all Freeview keyboard shortcuts are located here.
When the Navigation button  is chosen, you can move the image in the viewing window around by holding down the middle mouse button and dragging the mouse where you want the image to go. Try it out. To zoom, scroll with the middle mouse button. In this navigation mode, notice the cursor (little red crosshair) moves to wherever you left click. When you change the orientation (to axial or sagittal), you will be viewing the slice that intersects with the cursor's location. To illustrate this point, if you are in the viewing pane selected here:

You'll notice all the planes will shift based on where you move the cursor.
One other important thing to note is that any action you do in the viewing window (i.e. erasing, changing brightness, etc.) will take place on whichever volume is currently highlighted in the left menu, regardless of which file is at the top of the list.
Now that you know the basics, you can make your way through the data. To verify that FreeSurfer did a good job, you will want to check:
- Whether the surfaces accurately follow the gray matter and white matter boundaries.
- Whether the aseg accurately follows the subcortical intensity boundaries.
Checking the Surfaces
Double click on 'brainmask' in the left menu to bring it to the top of the volume list. The white surface (blue line) is used to calculate total white matter volume and should accurately follow the boundary between white matter and gray matter. The pial surface (red line) is used to calculate cortical gray matter volume and should accurately follow the boundary between the gray matter and the CSF.
As you scroll through the slices checking the surfaces for accuracy, keep in mind that you are looking at a 2-dimensional rendering of a 3-dimensional image - be sure to look at more than just one view (i.e., sagittal, coronal and horizontal). You can turn the surfaces off and on by checking and unchecking them in the left menu under where it says 'Surfaces'. As you do this, ask yourself: would you draw the boundary in the same location?
Keyboard Shortcut: Alt+f will turn on and off whichever surface is highlighted in the menu window.
To help verify accuracy, adjust the brightness and contrast so you can easily identify the shift in intensity between gray and white matter. To do this, left click on the image while holding down the 'Shift' key and drag your mouse. (Make sure the brainmask volume is highlighted in the left menu in order for this to work.) The other way to do this is via the 'Window' and 'Level' sliders underneath the left menu.
There are regions where the surfaces are not intended to be accurate that you should be aware of:
- Areas around the hippocampus and amygdala. The surfaces will not completely include or exclude certain subcortical regions. These inaccuracies can be ignored as subcortical regions are excluded from the cortical measures and subcortical volume is measured by the aseg, not the surfaces.
- For an example of this, scroll to coronal slice 128 (slice numbers appear in the upper right hand corner of the viewing window).
Subcortical Segmentation
Uncheck all of the surfaces. Then check the box next to the aseg volume and double click it. The aseg volume will jump to the top of the left menu, above the brainmask volume.
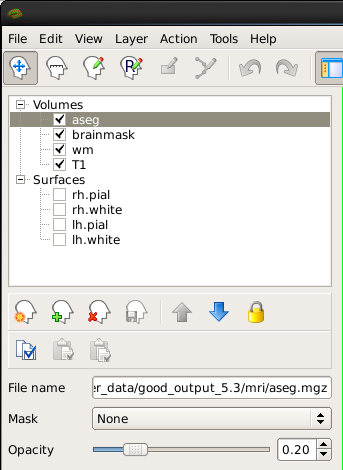
This will show the complete segmentation of the subcortical structures.
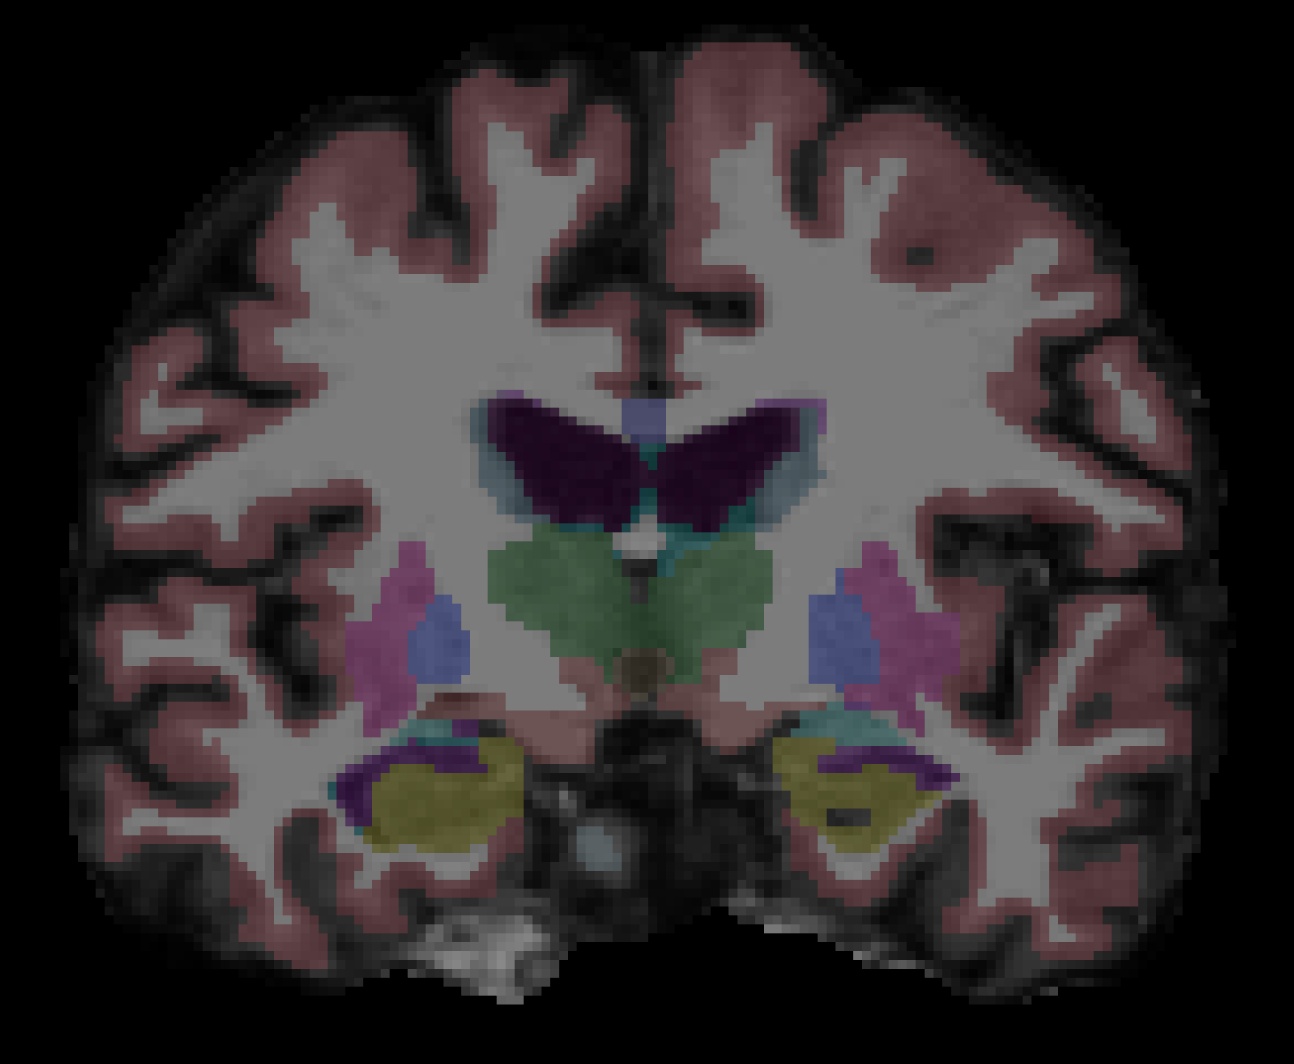
Each structure is labeled with a unique color/number distinction. If you click on a voxel the structure's name and number label will be shown in the 'Cursor' section under the viewing window next to the word, 'aseg'. If you hover over a voxel where the cursor is not located, the value of that voxel will appear under the 'Mouse' section.
Keyboard Shortcut: Alt+v will turn on and off the layer that is currently highlighted.
Make sure 'aseg' is highlighted in the left menu and press Alt+v to turn it off and on. While doing this, make sure the aseg is accurately following the underlying intensity boundaries of each structure. You can also adjust the 'Opacity' slider to better see the underlying brainmask.
Keyboard Shortcut: Alt+a and Alt+s will change the opacity of the layer that is currently highlighted.
Other Things To Do in Freeview
Below, we introduce you to other volumes and techniques which are good to be familiar with, especially when troubleshooting.
Skull Strip
Close the aseg. As you scroll through the brainmask volume, notice that there is no skull left in your image. You should also not see any regions of cortex or cerebellum missing from this volume. Bring the T1.mgz to the top of the volume list and toggle between it and the brainmask.mgz volume (Alt+v) to verify that the skullstrip has worked properly. In the TroubleshootingData tutorial, we'll go over what to do if there was a skull strip error.
Intensity Normalization
Scroll through the brainmask volume and notice that the intensity is uniform throughout. You should not see any very bright or very dark spots in the white matter or gray matter. If you click on a voxel in the white matter, you can see that it has been normalized to an intensity of (or close to) 110 (look under the Cursor section next to where it says 'brainmask'). When wm voxels are far from a value of 110, they may be erroneously excluded from the white surface. By "close to," we mean wm voxels have an intensity value of somewhere between 100 and 110. By "far from," we mean wm voxels are between a value of 85 and 100. In the TroubleshootingData tutorial, we'll go over what to do if there is an intensity normalization error.
WM Volume
Recheck all of the surfaces and then double click on the wm volume to bring it to the top of the list. This volume is FreeSurfer's initial segmentation of the white matter (shown in gray) with additions from the automatic topology fixer (in white). This "mask" is the starting point for the white surface which grows out from here and stops at a more accurate location using the intensity gradients in the brainmask.mgz volume as a guide. The wm.mgz can be used to add missing wm voxels or delete voxels that are not white matter but were included in the surface. In the TroubleshootingData tutorial, we'll go over how to do this and when. For now, it will be good to learn how to change the wm mask to a heat overlay for ease of editing. The "heat" setting is used for editing because it allows us to be able to see the underlying anatomy, while still being able to locate inaccuracies in the wm.mgz "mask." You can also use 'Jet' overlay, if you prefer. With wm highlighted in the left menu, take a look at the options next to Color Map and choose 'Heat' or 'Jet'. Then adjust the opacity so you can also see the brainmask underneath (down to around .25). It should look like this:
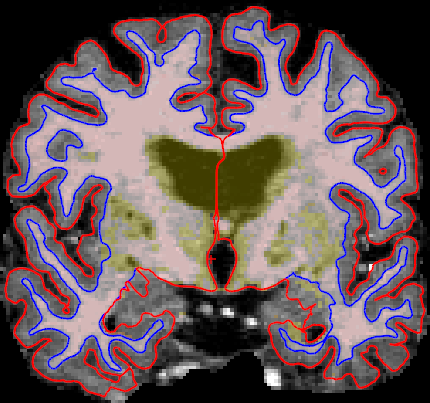
This could have also be done via commandline when first loading the wm in Freeview if we used this command: freeview -v wm.mgz:colormap=heat:opacity=0.25 brainmask.mgz (Note: You don't need to run this command.)
You can now close Freeview by hitting the X on the display window or Ctrl-q.
Viewing Surfaces in 3D using Freeview
We're now going to view several surface overlays. You could view the volumes discussed above and the overlays discussed below all in one Freeview session. They are separated in this tutorial only for simplicity. The examples below are displayed only on the left hemisphere, however, you could also view just the right hemisphere or both hemispheres at the same time. Here are some surfaces you can look at with Freeview:
- pial, white and inflated surface
- sulcal and curvature maps
- thickness maps
- cortical parcellation
You can load them all in Freeview with the command below (be patient while they all load):
freeview -f  good_output/surf/lh.pial:annot=aparc.annot:name=pial_aparc:visible=0 \
good_output/surf/lh.pial:annot=aparc.a2009s.annot:name=pial_aparc_des:visible=0 \
good_output/surf/lh.inflated:overlay=lh.thickness:overlay_threshold=0.1,3::name=inflated_thickness:visible=0 \
good_output/surf/lh.inflated:visible=0 \
good_output/surf/lh.white:visible=0 \
good_output/surf/lh.pial \
--viewport 3d
Some notes on the above command line:
lh.pial:annot=aparc.annot loads the Desikan-Killiany cortical parcellation on the pial surface. lh.pial:annot=aparc.a2009s.annot loads the Destrieux cortical parcellation on the pial surface.
:name=pial_aparc:visible=0 changes which name shows up in the menu display and turns off this layer
lh.inflated:overlay=lh.thickness:overlay_threshold=0.1,3 loads the thickness overlay on top of the inflated surface and sets the min and max thresholds to display
Pial Surface
The first volume you see is the pial surface. The pial surface here is the full 3D representation of the red surface you saw on each 2D slice of the brainmask volume, earlier in the tutorial. The green regions are gyri and the red regions are sulci. With this surface, the sulci are mostly hidden. Feel free to move the inflated brain around by left clicking on it and dragging the mouse. If you would like to put the brain back to its original state, go to View > Reset View, press Ctrl+r, or click the Reset button: 
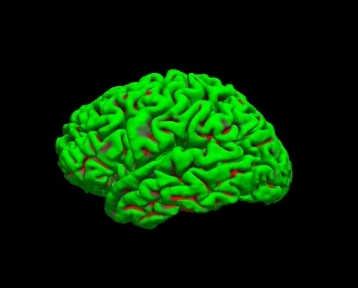
To get rid of the yellow lines being displayed on the surface (corresponding to the 3 slice views), right-click on the surface and check Hide All Slices, or hit Crtl+Shift+s.
White Surface
Press Alt+c to cycle to the white surface.
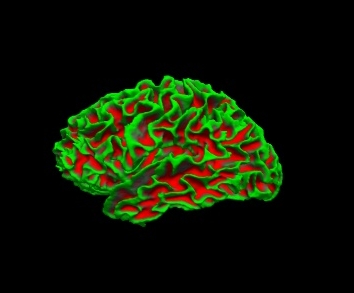
The white surface shows the boundary between white matter and gray matter. It is the 3D representation of the blue surface you saw on the 2D slices of the brainmask. With this surface, we are able to see the sulci a bit better. You can inspect this surface by rotating it around as you wish.
Inflated Surface
Press Alt+c to cycle to the curvature on the inflated surface. With the inflated surface, you can fully see the sulci. If you look at the options next to 'Curvature' in the left menu pane, you can switch it to binary to see the curvature in grayscale. Or switch it to 'off' to see the smooth inflated surface.
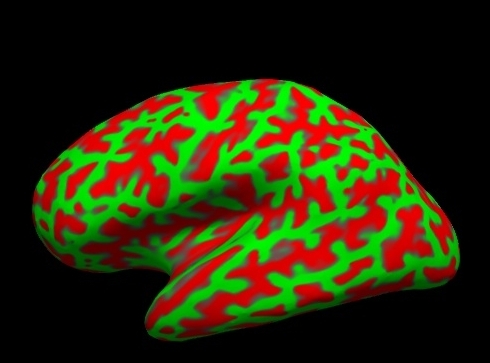
The inflated surface can be helpful to find bumps, holes, or other defects that may need to be corrected. If you click on the inflated surface, you will see the coordinates of the vertex you clicked on in the 'Cursor' window.
Thickness Map
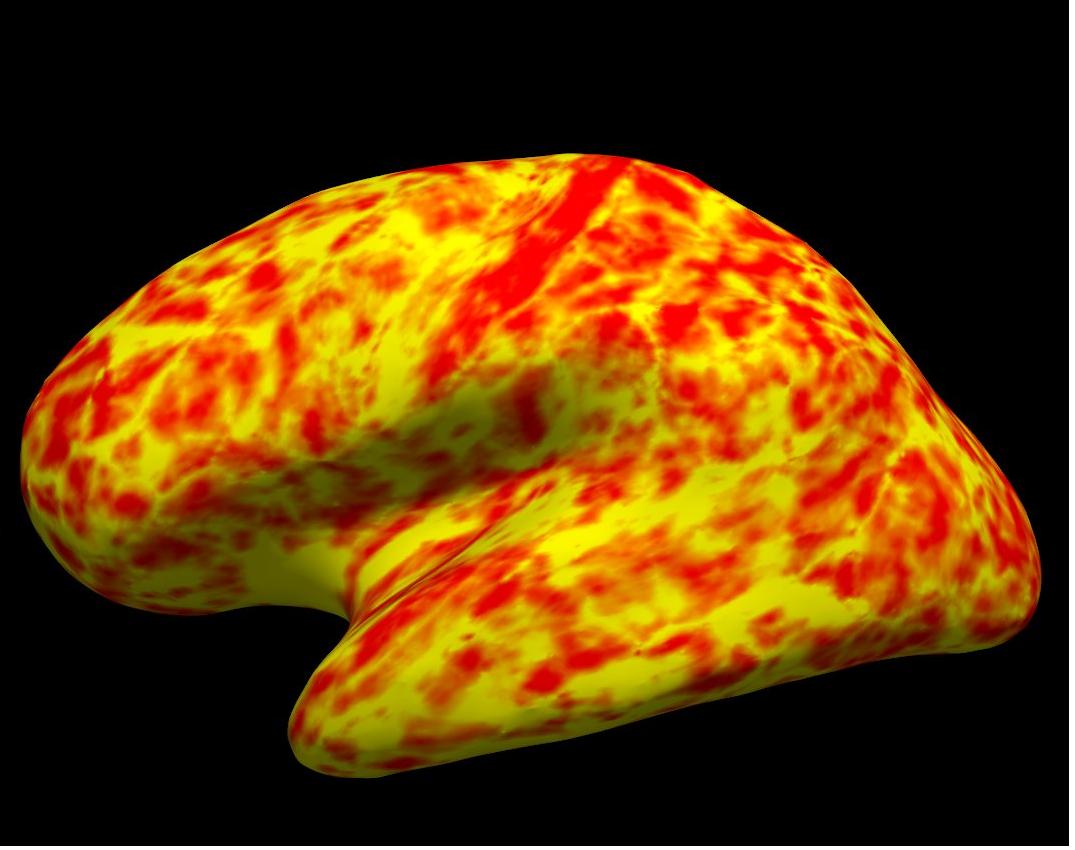
Press Alt+c to cycle to the thickness map on the inflated surface.
Cortical Parcellation
Press Alt+c to cycle to the cortical parcellations. On the left is the Desikan-Killiany parcellation and on the right is the Destrieux parcellation.
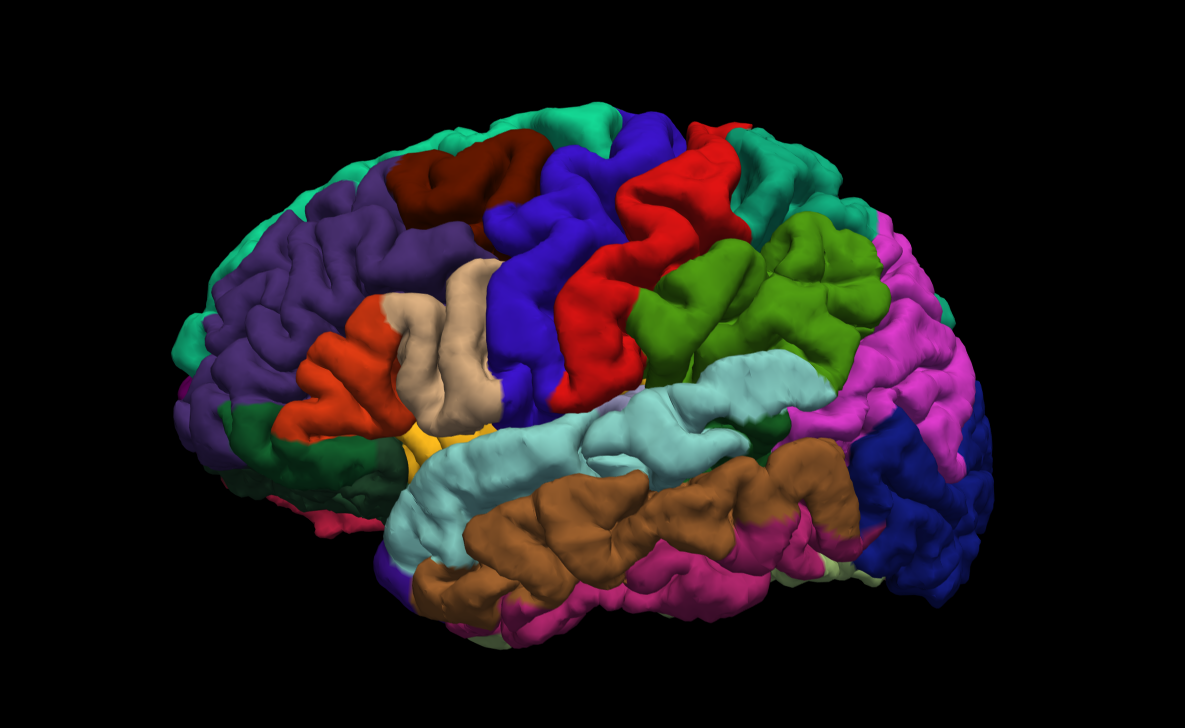
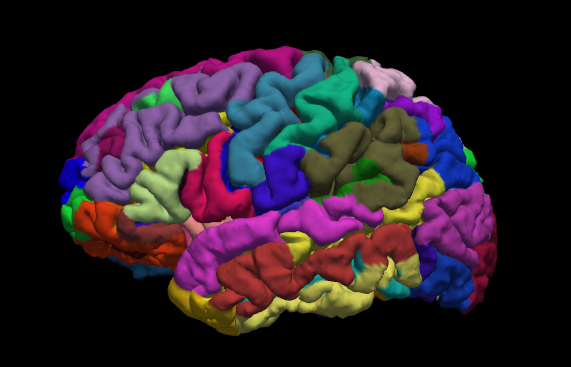
Click on a color and view the name of the cortical region in the 'Cursor' or 'Mouse' windows next to where it says 'aparc.annot'. Rotate the brain so you are looking at the medial wall. Notice that all subcortical gray matter is not a part of the surface labels (because again, those areas do not count towards the cortical surface measures).
By default there are two parcellations that are made when recon-all is run. The two parcellations are the ?h.aparc.annot, created with the Desikan-Killiany atlas, and the ?h.aparc.a2009s.annot, created with the Destrieux atlas. The difference is the number and designation of the areas that are labeled. You can load the Destrieux parcellation by clicking on the drop down box next to 'Annotation' on the left panel and choosing Load from file.... Browse to lh.aparc.a2009s.annot and hit 'Open'.
Summary
By the end of this exercise, you should know:
How to visualize and inspect FreeSurfer data
- The command to visualize data in Freeview
- What to look for when visualizing data including that surfaces follow the gray and white matter boundaries and that the aseg.mgz accurately follows the subcortical intensity boundaries
- The regions around the hippocampus and amygdala are not intended to be accurate and these inaccuracies can be ignored as subcortical regions are excluded from cortical measures
- Surfaces can be viewed in 3D such as the pial, white, and inflated surfaces, sulcul and cortical maps, thickness maps, and cortical parcellation.
This tutorial was meant as an introduction to Freeview. For information on buttons or menu options not covered here, you can find out about them on the FreeviewGuide wiki.
Exercise 1
Difficulty: Beginner
Goal: Practice basic Freeview tasks.
In the examples above you looked at data from a subject called “good_output”. For this challenge complete the following tasks for subject “004”.
- Open the subject’s aparc+aseg.mgz volume with a colormap of “lut”.
- Swap the view to sagittal
- Navigate with the arrow keys to find the right putamen
Need a hint?
Here is how you opened up a similar volume for the “good_output” subject: freeview -v good_output/mri/aseg.mgz:colormap=lut
Please note that we were in the $TUTORIAL_DATA/buckner_data/tutorial_subjs directory when we used that command - so cd there if you'd like to base your command off the above example.
Want to know the answer? Click and drag to highlight and reveal the text below.
cd $TUTORIAL_DATA/buckner_data/tutorial_subjs |
freeview -v 004/mri/aparc+aseg.mgz:colormap=lut |
Exercise 2
Difficulty: Beginner
Goal: Practice visualizing data with overlays.
- Open 004’s lh.pial surface, with the overlay named lh.thickness, set the overlay to display with a threshold of 1,2
- Look up vertex 141813
- What is the thickness and label of this vertex?
Need a hint?
Here is how you opened up a similar surface for the good_output subject, with thickness information: freeview -f good_output/surf/lh.inflated:overlay=lh.thickness:overlay_threshold=0.1,3 --viewport 3d
And here is how you opened up a similar surface for the good_output subject with the Desikan-Killany parcellation: freeview -f good_output/surf/lh.pial:annot=aparc.annot
Please note that we were in the $TUTORIAL_DATA/buckner_data/tutorial_subjs directory when we used that command - so cd there if you'd like to base your command off the above example.
Want to know the answer? Click and drag to highlight and reveal the text below.
cd $TUTORIAL_DATA/buckner_data/tutorial_subjs |
freeview -f 004/surf/lh.pial:overlay=lh.thickness:overlay_threshold=1,2 --viewport 3d |
Exercise 3
Difficulty: Beginner
Goal: Practice opening multiple files at a time with FreeView.
- For this challenge start with this terminal command:
freeview -v 004/mri/wm.mgz:colormap=jet 004/mri/brainmask.mgz -f 004/surf/lh.pial:edgecolor=blue 004/surf/lh.white:edgecolor=red
- Right now it only opens the left hemisphere pial and white matter surfaces, alter it to open both for the right hemisphere as well, with colors that match the left hemisphere side.
- Once you have the last command working, rearrange the volume layers in freesurfer so that the wm.mgz is at %20 opacity and the brainmask can be seen underneath it (this can also be done through altering the terminal command - you can choose which way to do so).
- You will need to be in $TUTORIAL_DATA/buckner_data/tutorial_subjs for the command to work, so cd there if needed
Want the solution? Click and drag to highlight and reveal the text below.
cd $TUTORIAL_DATA/buckner_data/tutorial_subjs |
freeview -v 004/mri/brainmask.mgz 004/mri/wm.mgz:colormap=jet:opacity=.2 -f 004/surf/lh.pial:edgecolor=blue 004/surf/lh.white:edgecolor=red 004/surf/rh.pial:edgecolor=blue 004/surf/rh.white:edgecolor=red |
Exercise 4
Difficulty: Intermediate - assumes some comfort with navigating Unix and FreeView
Goal: Export a series of images from FreeView and stitch them together to create a GIF.
- Open up any surface from the tutorial data
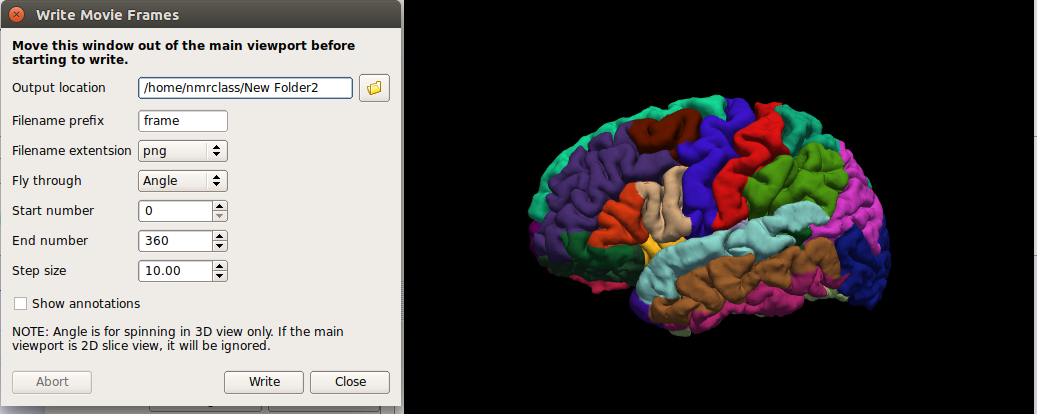
Set the viewport to 3d view, right click in the viewport and select Hide All Slices
In the File menu, select Save Movie Frames
Set up the options as in the following picture - you will likely want to create a new directory in your home directory to save the output to.
- In a terminal, navigate to the new directory you output the movie data to.
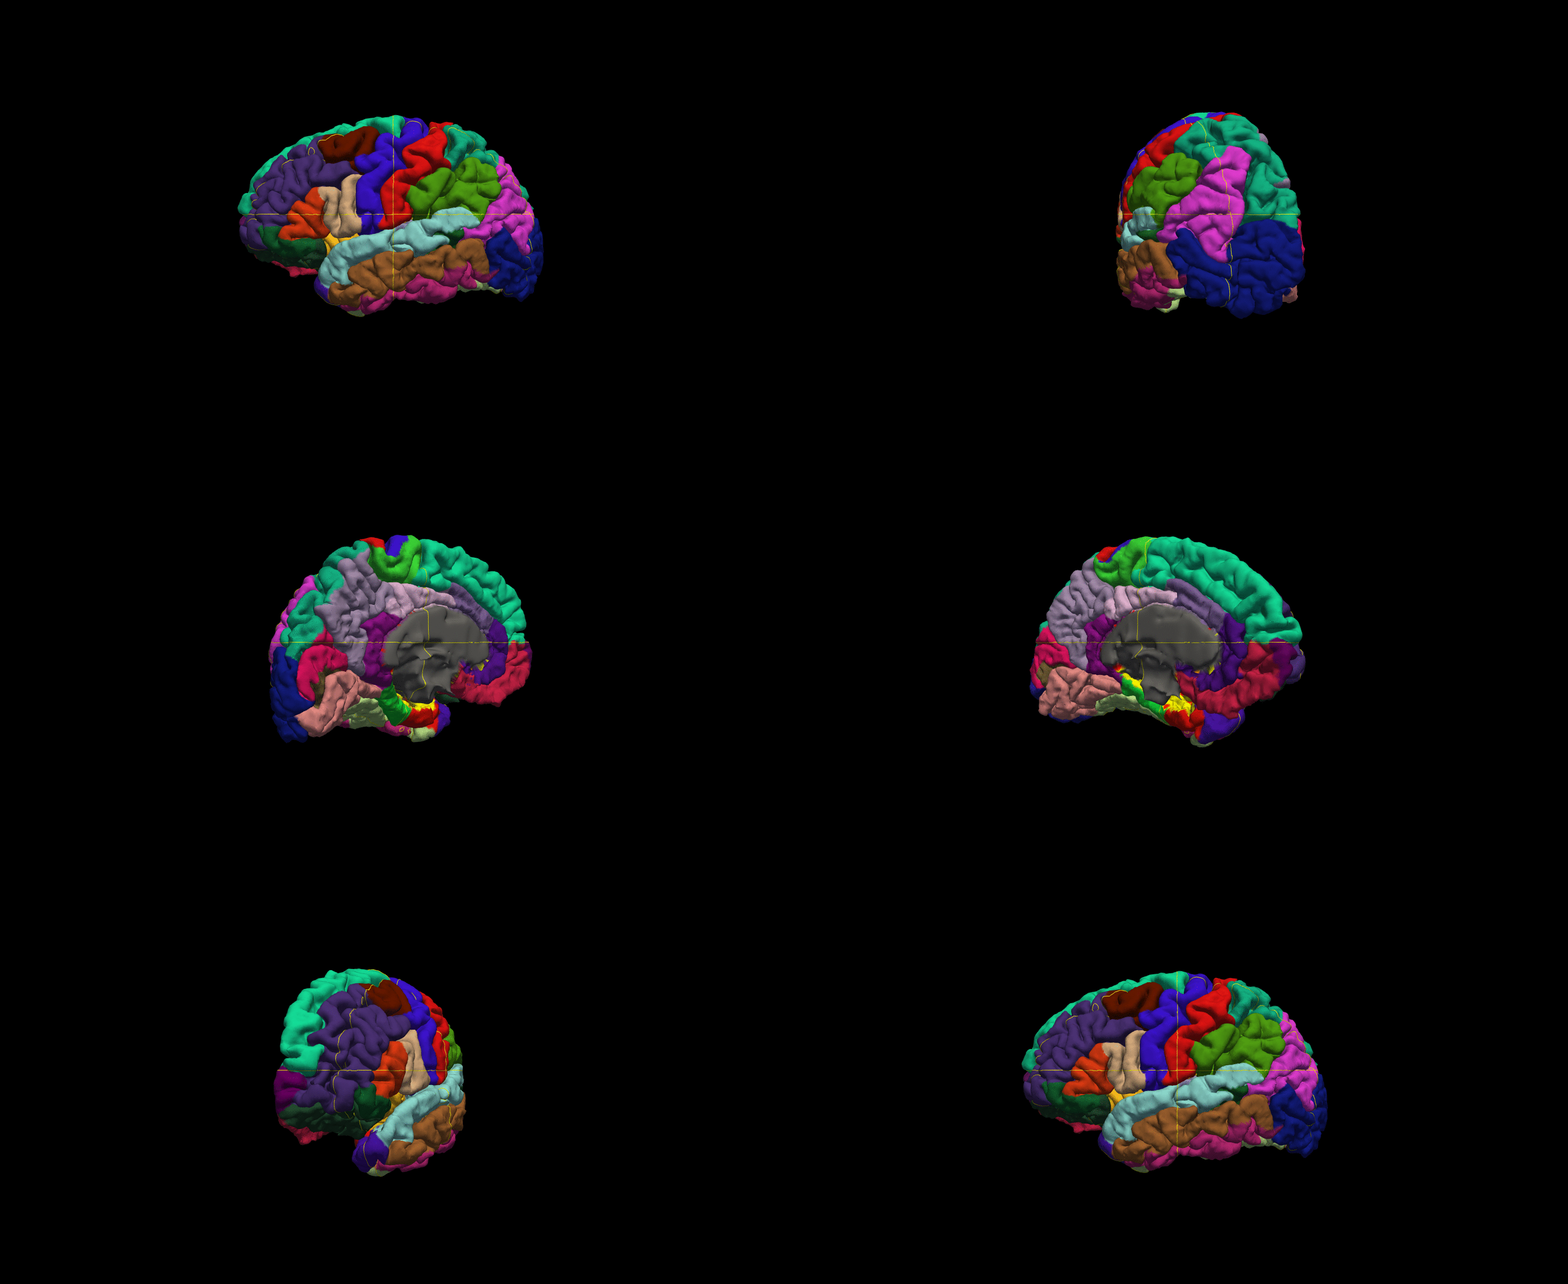
Run this command: convert -delay .1 *.png brainanim.gif
Note: convert is from the ImageMagick library, this is setup on the course computers. If you are doing the tutorials from home you can get a copy of ImageMagick here https://imagemagick.org/index.php
-delay determines the gap between frames, *.png selects all png files in the working directory, brainanim.gif is the output name.
To view your GIF, open it with firefox firefox brainanim.gif
Quiz
You can test your knowledge of this tutorial by clicking here for a quiz!
