Back to list of all tutorials
Back to course page
FslFeat Tutorial Homepage
Registering FSL Feat output to the anatomical
The registration is a multi-step process. Each step is described in detail below.
Preparations
To begin the exercises, first enter the following:
If You're at an Organized Course
If you are taking one of the formally organized courses, everything has been set up for you on the provided laptop. The only thing you will need to do is run the following commands in every new terminal window (aka shell) you open throughout this tutorial. Copy and paste the commands below to get started:
export SUBJECTS_DIR=$TUTORIAL_DATA/buckner_data/tutorial_subjs
cd $SUBJECTS_DIR/fbert-feat
ln -s $FREESURFER_HOME/subjects/fsaverage
ln -s $FREESURFER_HOME/subjects/bert
To copy: Highlight the command in the box above, right click and select copy (or use keyboard shortcut Ctrl+c), then use the middle button of your mouse to click inside the terminal window (this will paste the command). Press enter to run the command.
These two commands set the SUBJECTS_DIR variable to the directory where the data is stored and then navigates into the subdirectory you'll be working in. You can now skip ahead to the tutorial (below the gray line).
If You're not at an Organized Course
If you are NOT taking one of the formally organized courses, then to follow this exercise exactly be sure you've downloaded the tutorial data set before you begin. If you choose not to download the data set you can follow these instructions on your own data, but you will have to substitute your own specific paths and subject names. These are the commands that you need to run before getting started:
## bash
<source_freesurfer>
export TUTORIAL_DATA=<path_to_your_tutorial_data>
export SUBJECTS_DIR=$TUTORIAL_DATA/buckner_data/tutorial_subjs
cd $SUBJECTS_DIR/fbert-feat
ln -s $FREESURFER_HOME/subjects/fsaverage
ln -s $FREESURFER_HOME/subjects/bert

## csh
source your_freesurfer_dir/SetUpFreeSurfer.csh
setenv TUTORIAL_DATA <path_to_your_tutorial_data>
setenv SUBJECTS_DIR $TUTORIAL_DATA/buckner_data/tutorial_subjs
cd $SUBJECTS_DIR/fbert-feat
ln -s $FREESURFER_HOME/subjects/fsaverage
ln -s $FREESURFER_HOME/subjects/bert
Information on how to source FreeSurfer is located here.
If you are not using the tutorial data you should set your SUBJECTS_DIR to the directory in which the recon(s) of the subject(s) you will use for this tutorial are located.
The subjects 'fsaverage' and 'bert' may already exist in the subjects directory, so ignore any warnings that might be issued that say 'File exists'.
1.1 Automatic registration
The program that performs the registration is called reg-feat2anat (which uses FLIRT to do the actual computations). Information about how to run this program and what this program is doing can be obtained with:
reg-feat2anat --help
Now, run the registration for bert's first fMRI data:
reg-feat2anat --feat fbert1.feat --subject bert
Verify that this created directory fbert1.feat/reg/freesurfer. There are several files with matrices in them. The most important one is anat2exf.register.dat.
1.2 Manual Checking/Editing the registration
You should ALWAYS visually check your registration. This is done with tkregister2 through reg-feat2anat. This program brings up a GUI which allows you to inspect and interactively edit the registration matrix. tkregister2 is a complicated with lots of features. You can get a full help on it with:
tkregister2 --help
To check the registration computed in the previous step, run:
reg-feat2anat --feat fbert1.feat --manual
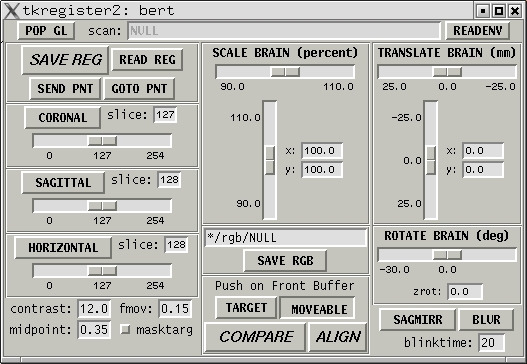
You will see the following GUI window:
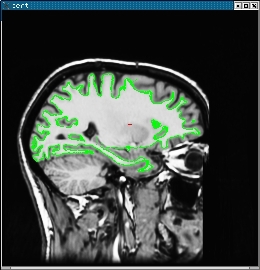
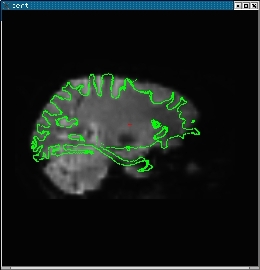
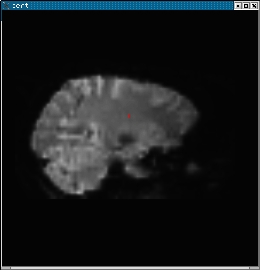
You will also see an anatomical similar to the one on the left below. Pressing the "COMPARE" button will allow you to flip between the anatomical (left) and functional (middle). The green line is the orig surface. It is the same in both the anatomical and functional. The right is the same image as the middle without the surface.
1.3 Navigating through tkregister2
tkregister2 is controlled through the interface and through keypress commands. When using a keypress command, the image window must have control of the cursor; this can be accomplished by clicking in the image window. Here are some useful commands.
A. To switch between the functional and anatomical, press the "COMPARE" button.
B. To change orientation, press the CORONAL, SAGITTAL, or HORIZONTAL button.
C. To change slice, operate the slider.
D. To change the functional brightness, change the value in the "fmov" entry box. Or you can use the 'i' keypress command to turn on automatic intensity normalization.
E. To toggle the surface on and off, use the 's' keypress command.
You can get more information on keypress commands and general usage with:
tkregister2 --help.
1.4 Evaluating the registration
The first step in evaluation is to make sure that there was no catastrophic failure, e.g., the functional is rotated by 90 degrees with respect to the anatomical, or is shifted by a large amount. Such failures are usually caused by failures in the registration to standard space (see section on troubleshooting).
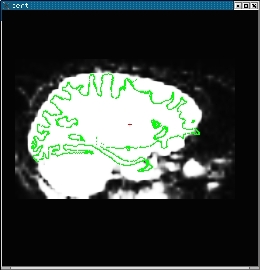
The second step is to make sure there was not a left-right flip. This is tricky because the brain is very symmetrical. However, the cortical folding patterns often have subtle asymmetries. In general, you cannot see the folding patterns in the functional, but you can see the CSF which will also follow the surface (see the images above). Make sure that asymmetries in the (green) surface are present in the CSF.
The final step is to check the alignment. This is done by making sure that green surface follows the contour of the CSF.
1.5 Pitfalls
There are several ways in which the registration may be good but can appear bad. First, don't evaluate the registration in areas known to have B0 distortion (e.g., orbital frontal, medial temporal lobe). Second, be careful using the ventricles for alignment. The anterior portion is often susceptible to B0 distortion. Third, if it looks like the surface cuts through a CSF fold, look at adjacent slices to see if it lines up better. This can happen because functional voxels are so big. Finally, be careful trying to use what looks like the edge of the brain in the functional. For example, in the middle image above, it looks like the surface extends beyond the top of the brain. However, if we adjust the brightness (set fmov to 1; see image below), one can clearly see that the surfaces are actually in brain.
1.6 Editing the registration
If for some reason you do not believe that the automatic registration is sufficiently close, you can edit the registration manually. tkregister allows you to translate, rotate, and scale the brain using the sliders on the right side of the GUI. All the modifications happen in the viewing plane. The rotations are about the red cross. Note: you should not need to adjust the scale (ie, stretch the brain) because both brains belong to the same person. This is equivalent to contraining the registration to be rigid (ie, 6 DOF). When done, press the "SAVE REG" button. Note that if you modify the registration, don't re-run reg-feat2anat as that will overwrite your edits. As an exercise, try translating the functional. First, view the functional and then move the "TRANSLATE" slider. You will see the functional brain translate (the green surface will be fixed). DON'T save the registration (if you do, then just re-run reg-feat2anat).You can get more information on editing the registration with: tkregister2 --help.
1.7 Check FEAT registration to Standard Space
This registration tool can be used to check and adjust the FEAT registration to standard space with:
reg-feat2anat --feat fbert1.feat --manxfm func2std
Back to list of all tutorials
Back to course page
FslFeat Tutorial Homepage
