FreeSurfer 6 Release
Contents
System Requirements
Summary of Requirements:
Operating System: Linux, macOS
Processor Speed: 2GHz at least
RAM: 8GB recommended
Graphics card: 3D graphics card with its own graphics memory & accelerated OpenGL drivers (for visualization)
Size of installation package: 10GB
Typical size of a processed subject: 300MB
Other requirements: Matlab (only needed to run FS-FAST, the fMRI analysis stream)
Download
FreeSurfer 6.0 Release ReleaseNotes
Important Note: When processing a group of subjects for your study, it is essential to process all your subjects with the same version of FreeSurfer, on the same OS platform and vendor, and for safety, even the same version of the OS. While we continue to work to ensure that results match across platforms, there are none-the-less system-level libraries that are OS dependent. An exception to this rule is that you may view and edit files across any platform or version, and run some post-processing tools (outside the recon-all stream) if you check with us first (for instance you may run the longitudinal processing with newer versions).
OS |
Build Platform |
Version |
Release Date |
Download |
Size |
Linux |
CentOS 6 x86_64 (64b) |
stable v6.0.0 |
23 Jan 2017 |
4.6G |
|
macOS |
Lion OS X 10.7 (64b Intel) |
stable v6.0.0 |
23 Jan 2017 |
4.4G |
Development 7.0.0 beta 1 Release: The beta 1 release from the development branch here.
Ubuntu 18.04 VM disk image (.vdi) with 6.0.0 Release and Development 7.0.0 beta 1 Release: A VirtualBox Ubuntu image to run on Windows, the Mac and/or other Linux OS flavors VM_setup.
Development Version: Daily builds of FreeSurfer can be downloaded from here.
Previous Releases: Old releases of FreeSurfer can be downloaded from here.
Freeview: For instructions on how to update Freeview - FreeSurfer's mri viewing application - go to the following page: Updating Freeview
Installation
Linux: Installing FreeSurfer on Linux systems involves simply extracting the contents of the .tar.gz file somewhere on your machine. Installing into the directory /usr/local is recommended. For example:
$> tar -C /usr/local -xzvf freesurfer-Linux-centos6_x86_64-stable-pub-v6.0.0.tar.gz
Mac: Step-by-step instructions, including notes on how to bypass the unidentified developer issue. The default FreeSurfer installation location on macOS is in the /Applications/freesurfer directory.
Package Requirements
If you're installing freesurfer on linux by extracting the tar.gz file, a few external packages are required. Since they are common packages, they most-likely already exist on your system, but to download them run the following:
On Ubuntu:
apt-get -y install bc binutils libgomp1 perl psmisc sudo tar tcsh unzip uuid-dev vim-common libjpeg62-dev
On Centos:
yum -y install bc libgomp perl tar tcsh
Setup & Configuration
To begin using FreeSurfer, you need to open a terminal window and define and environment variable called FREESURFER_HOME which is set to the location FreeSurfer was installed, and then source the setup script. Sourcing FreeSurfer needs to be done every time you open a new terminal window. Or, you can add the two lines below to your default setup file (.bashrc or .cshrc) and FreeSurfer will be sourced automatically every time you open a new window.
Linux:
## bash
$> export FREESURFER_HOME=/usr/local/freesurfer
$> source $FREESURFER_HOME/SetUpFreeSurfer.sh

## tcsh
$> setenv FREESURFER_HOME /usr/local/freesurfer
$> source $FREESURFER_HOME/SetUpFreeSurfer.csh
Mac:
$> export FREESURFER_HOME=/Applications/freesurfer
$> source $FREESURFER_HOME/SetUpFreeSurfer.sh
If done correctly, you should see output similar to this:
Setting up environment for FreeSurfer/FS-FAST (and FSL)
FREESURFER_HOME /usr/local/freesurfer
FSFAST_HOME     /usr/local/freesurfer/fsfast
FSF_OUTPUT_FORMAT nii
SUBJECTS_DIR    /usr/local/freesurfer/subjects
MNI_DIR         /usr/local/freesurfer/mni
SUBJECTS_DIR (location of subject data)
FreeSurfer requires an environment variable called SUBJECTS_DIR. This is the directory where subject data is stored. By default, the FreeSurfer setup script will create the SUBJECTS_DIR environment variable and set it to the FREESURFER_HOME/subjects directory - if it is not yet defined. However, in nearly all cases, users will want to set the SUBJECTS_DIR environment variable themselves to the location of their subjects data. This can be done before or after sourcing the setup script (SUBJECTS_DIR will NOT be overwritten if it already exists):
## bash
$> export SUBJECTS_DIR=<path to subject data>

## tcsh
$> setenv SUBJECTS_DIR <path to subject data>
License
A license key must be obtained to make the FreeSurfer tools operational. Obtaining a license is free and comes in the form of a license.txt file. Once you obtain the license.txt key file, copy it to your FreeSurfer installation directory. This is also the location defined by the FREESURFER_HOME environment variable.
Follow this link to obtain a license key.
Test your FreeSurfer Installation
FreeSurfer comes with two sample data files (sample-001.mgz and sample-002.mgz) as well as a fully recon-ed subject named bert. These data files can be used to test that your FreeSurfer installation was done properly. To test your installation, please try the following examples:
Example 1: Convert the sample-001.mgz to nifti format.
$> cp $FREESURFER_HOME/subjects/sample-001.mgz .
$> mri_convert sample-001.mgz sample-001.nii.gz
...
reading from sample-001.mgz...
TR=7.25, TE=3.22, TI=600.00, flip angle=7.00
i_ras = (-0, -1, -0)
j_ras = (-0, 0, -1)
k_ras = (-1, 0, 0)
writing to sample-001.nii.gz...
Example 2: Perform a full recon-all on the nifti file.
$> export SUBJECTS_DIR=<path to subject directory>
$> recon-all -i sample-001.nii.gz -s bert -all (creates a folder called bert in SUBJECTS_DIR)
Example 3: Perform a full recon-all on a pre-existing subject folder
$> export SUBJECTS_DIR=<path to subject directory>
$> recon-all -s bert -all
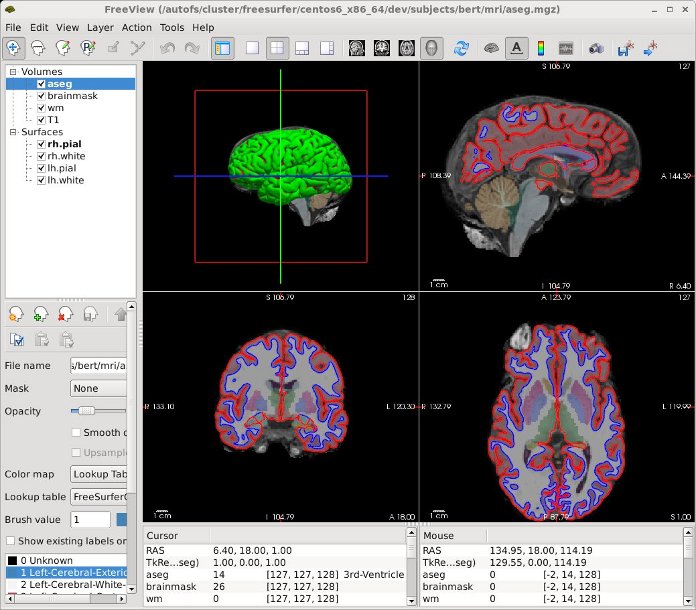
Example 4: View the output volumes, surfaces and subcortical segmentation of the fully recon-ed subject bert.
$> cd $SUBJECTS_DIR
$> freeview -v \
    bert/mri/T1.mgz \
    bert/mri/wm.mgz \
    bert/mri/brainmask.mgz \
    bert/mri/aseg.mgz:colormap=lut:opacity=0.2 \
    -f \
    bert/surf/lh.white:edgecolor=blue \
    bert/surf/lh.pial:edgecolor=red \
    bert/surf/rh.white:edgecolor=blue \
    bert/surf/rh.pial:edgecolor=red
The freeview above command will open the freeview GUI and should look similar to the image below.

Additional Resources
Sign up for a FreeSurfer course
Join the FreeSurfer mailing list, ask a question, or view the archives
 A free and open platform that can be used to run FreeSurfer. For more information, click here.
